A Compiler for Ael
Background
Let’s walk through in detail a compiler for the little language Ael, whose detailed design and formal specification we studied earlier. Review it now if you’ve forgotten about it. Even though this is our first compiler, it’s not really a toy application. We’re not going to mess around. This project:
- Is written in a modular fashion, using some best practices, including full-coverage unit testing
- Prints the output of each phase (this introspection is good for learning about language translation)
- Includes code generators for JavaScript, C, and the LLVM IR (again, this project is a learning experience)
Ready to get started?
Project Organization
Let’s start by browsing the organization:
    .
    ├── .gitignore
    ├── LICENSE
    ├── README.md
    ├── package.json           -- configuration because this is a Node.js app
    ├── .prettierrc.json       -- bc we all have our own preferences 🤪
    ├── docs
    │   └── ...
    ├── examples
    │   └── ...
    ├── src
    │   ├── ael.js             -- to run from command line
    │   ├── compiler.js        -- ties all the phases together
    │   ├── parser.js          -- source code to AST (syntax only)
    │   ├── ast.js             -- defines the nodes of the AST
    │   ├── analyzer.js        -- checks the semantic rules
    │   ├── optimizer.js       -- makes it faster, right?
    │   └── generator          -- backend: translates to the target language
    │       ├── index.js       -- Node.js requires this (like __init__.py in Python)
    │       ├── js.js
    │       ├── c.js
    │       └── llvm.js
    └── test
        ├── compiler.test.js
        ├── parser.test.js
        ├── analyzer.test.js
        ├── optimizer.test.js
        └── generator.test.js
This is pretty standard stuff. Note git for version control. And of course Prettier. You should always use Prettier.
The README
Assuming we’ve already gone thorough the language design process, we can begin by documenting our language and compiler. We’ll do it in a classic README file. We make sure we have (1) a logo for the language, (2) a title for the README, (3) grammar highlights or links to the grammar, (4) sample programs, and (5) instructions for using the compiler (perhaps with sample output).Read and study the entire README.md file now.
Configuration Files
As this is a Node.js project, we’ll have a package.json file. It’s good to be relatively complete. Here’s the one generated for this project:
{
  "name": "ael-ohm",
  "version": "1.0.0",
  "description": "Compiler for Ael using Ohm",
  "main": "ael.js",
  "type": "module",
  "scripts": {
    "test": "c8 node_modules/.bin/mocha"
  },
  "license": "MIT",
  "dependencies": {
    "ohm-js": "^15.3.0"
  },
  "devDependencies": {
    "c8": "^7.4.0",
    "mocha": "^8.2.1"
  }
}
You’ll notice three AWESOME third-party libraries:
- Ohm, a library for language processing
- Mocha, for unit testing
- c8, for measuring test coverage
Oh, and always remember to use Prettier. I like almost all the default options for Prettier, but you can see there are some I need to override:
{
  "semi": false,
  "arrowParens": "avoid"
}
The Compiler Interface
We want our compiler to do more than just output target code in one shot using some single file monolithic hot mess of code. We want to be able to run the compiler to see the AST, or the analyzed AST, or the optimized code or the target code. Here are some sample runs:
$ cat examples/simple.ael
let dozen = 1 * (0 + sqrt 101.3)
let y = dozen - 0    // TADA 🥑
dozen = 0 / y
print abs dozen //

$ src/ael.js examples/simple.ael ast
   1 | Program statements=[#2,#6,#8,#10]
   2 | VariableDeclaration name='dozen' initializer=#3
   3 | BinaryExpression op='*' left=1 right=#4
   4 | BinaryExpression op='+' left=0 right=#5
   5 | UnaryExpression op='sqrt' operand=101.3
   6 | VariableDeclaration name='y' initializer=#7
   7 | BinaryExpression op='-' left=dozen right=0
   8 | Assignment target=dozen source=#9
   9 | BinaryExpression op='/' left=0 right=y
  10 | PrintStatement argument=#11
  11 | UnaryExpression op='abs' operand=dozen

$ src/ael.js examples/simple.ael analyzed
   1 | Program statements=[#2,#7,#10,#12]
   2 | VariableDeclaration name='dozen' initializer=#3 variable=#6
   3 | BinaryExpression op='*' left=1 right=#4
   4 | BinaryExpression op='+' left=0 right=#5
   5 | UnaryExpression op='sqrt' operand=101.3
   6 | Variable name='dozen'
   7 | VariableDeclaration name='y' initializer=#8 variable=#9
   8 | BinaryExpression op='-' left=#6 right=0
   9 | Variable name='y'
  10 | Assignment target=#6 source=#11
  11 | BinaryExpression op='/' left=0 right=#9
  12 | PrintStatement argument=#13
  13 | UnaryExpression op='abs' operand=#6

$ src/ael.js examples/simple.ael optimized
   1 | Program statements=[#2,#4,#6,#7]
   2 | VariableDeclaration name='dozen' initializer=10.064790112068906 variable=#3
   3 | Variable name='dozen'
   4 | VariableDeclaration name='y' initializer=#3 variable=#5
   5 | Variable name='y'
   6 | Assignment target=#3 source=0
   7 | PrintStatement argument=#8
   8 | UnaryExpression op='abs' operand=#3

$ src/ael.js examples/simple.ael js
let dozen_1 = 10.064790112068906;
let y_2 = dozen_1;
dozen_1 = 0;
console.log(Math.abs(dozen_1));

$ src/ael.js examples/simple.ael c
#include <stdio.h>
#include <math.h>
int main() {
double dozen_1 = 10.064790112068906;
double y_2 = dozen_1;
dozen_1 = 0;
printf("%g\n", fabs(dozen_1));
return 0;
}

$ src/ael.js examples/simple.ael llvm
@format = private constant [3 x i8] c"%g\0A"
declare i64 @printf(i8*, ...)
declare double @llvm.fabs(double)
declare double @llvm.sqrt.f64(double)
define i64 @main() {
entry:
%0 = call double @llvm.fabs(double 0.0)
call i64 (i8*, ...) @printf(i8* getelementptr inbounds ([3 x i8], [3 x i8]* @format, i64 0, i64 0), double %0)
ret i64 0
}
The command line script we invoke is very small; it delegates all the work to a function that does the compilation. This way the compiler can be embedded into another application as well as being run from the command line.
Examine and study the complete command line script and the complete programmatic interface on GitHub now.
The Unit Tests
JavaScript programmers have many choices for test frameworks. I used Mocha for this project.
Running the tests are easy:
$ npm test

> ael-ohm@1.0.0 test /Users/ray/git-repos/ael-ohm
> c8 node_modules/.bin/mocha

  The analyzer
    ✓ recognizes print declared variable
    ✓ recognizes assign declared variable
    ✓ throws on redeclarations
    ✓ throws on non declared ids
    ✓ properly rewrites the AST for Variable created & resolved

  The compiler
    ✓ says 'Unknown output type' when the output type is unknown
    ✓ calls the compiler with the ast option
    ✓ calls the compiler with the analyzed option
    ✓ calls the compiler with the optimized option
    ✓ generates js code when given the js option
    ✓ generates js code when given the c option
    ✓ generates js code when given the llvm option
    ✓ returns an error message on a bad option argument

  The code generator
    ✓ produces expected js output for the small program
    ✓ produces expected c output for the small program
    ✓ produces expected llvm output for the small program

  The optimizer
    ✓ folds +
    ✓ folds -
    ✓ folds *
    ✓ folds /
    ✓ optimizes +0
    ✓ optimizes -0
    ✓ optimizes *1
    ✓ optimizes /1
    ✓ optimizes *0
    ✓ optimizes 0*
    ✓ optimizes 0/
    ✓ optimizes 0+
    ✓ optimizes 0-
    ✓ optimizes 1*
    ✓ folds negation
    ✓ folds abs for negatives
    ✓ folds abs for positive
    ✓ folds sqrt
    ✓ removes x=x at beginning
    ✓ removes x=x at end
    ✓ removes x=x in middle
    ✓ passes through nonoptimizable constructs

  The parser
    ✓ recognizes that all numeric literal forms
    ✓ recognizes that complex expressions
    ✓ recognizes that end of program inside comment
    ✓ recognizes that comments with no text
    ✓ recognizes that non-Latin letters in identifiers
    ✓ throws on non-letter in an identifier
    ✓ throws on malformed number
    ✓ throws on a missing right operand
    ✓ throws on a non-operator
    ✓ throws on an expression starting with a )
    ✓ throws on a statement starting with expression
    ✓ throws on an illegal statement on line 2
    ✓ throws on a statement starting with a )
    ✓ throws on an expression starting with a *
    ✓ produces the expected AST for all node types


  53 passing (92ms)

-------------------|---------|----------|---------|---------|-------------------
File               | % Stmts | % Branch | % Funcs | % Lines | Uncovered Line #s
-------------------|---------|----------|---------|---------|-------------------
All files          |     100 |      100 |     100 |     100 |
 src               |     100 |      100 |     100 |     100 |
  analyzer.js      |     100 |      100 |     100 |     100 |
  ast.js           |     100 |      100 |     100 |     100 |
  compiler.js      |     100 |      100 |     100 |     100 |
  optimizer.js     |     100 |      100 |     100 |     100 |
  parser.js        |     100 |      100 |     100 |     100 |
 src/generator     |     100 |      100 |     100 |     100 |
  c.js             |     100 |      100 |     100 |     100 |
  index.js         |     100 |      100 |     100 |     100 |
  js.js            |     100 |      100 |     100 |     100 |
  llvm.js          |     100 |      100 |     100 |     100 |
-------------------|---------|----------|---------|---------|-------------------
Because this project is so small, I added coverage to the npm test script.
The Parser
The parser module exports the parse function to map a string into an AST. The AST is represented as a tree of nodes rooted at a single instance of the Program class. The AST nodes are defined in a separate module.
For the sample program in the README:
let dozen = 1 * (0 + sqrt 101.3)
let y = dozen - 0    // TADA 🥑
dozen = 0 / y
print abs dozen //
the parser produces the following AST:
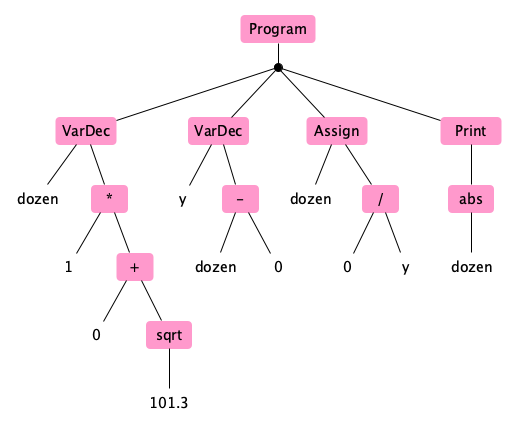
which is represented internally within the compiler as:
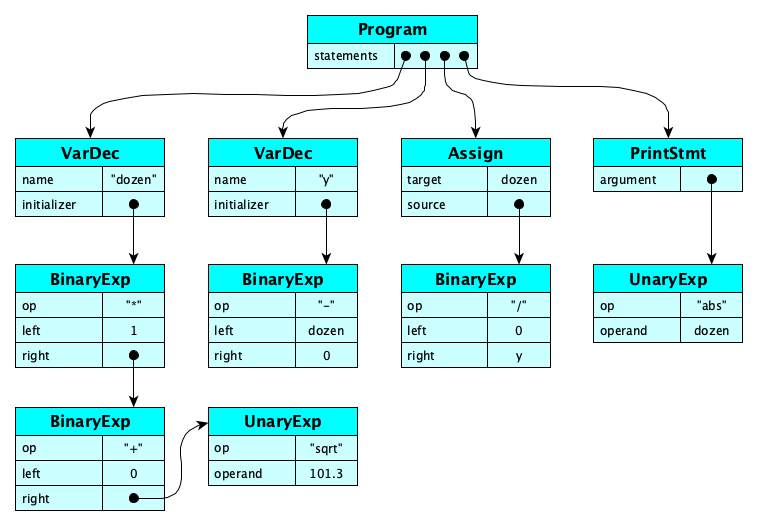
The ast module features a nice little pretty-printing function for the tree, which gives you the text output shown previously. Are you good with d3.js or similar libraries? If so, consider writing a function that generates a force graph for ASTs.
Study the complete parser module now. Notice the Ohm description of the grammar as well as the use of Ohm library functions to generate our AST. We’ll go over how Ohm does this in class, but you can, and should eventually, read the Ohm documentation on this as well.
Study the complete ast module now. This module defines all the AST node classes. Should be straightforward, if you were prepared by reading the earlier notes on the design of Ael.
Study the complete parser test suite now. You love writing unit tests, right?
The Semantic Analyzer
In compilers for large languages, semantic analysis is really meaty. In Ael, not so much. We just have to check for uses of undeclared identifiers and re-declarations of identifiers. The analyzer in this project has a comment informing you of things that more complicated languages would need analyzed.
The analyzer works by walking the AST and doing the following:
- When it sees a declaration, it checks the context to make sure the identifier has not yet been seen. If it has, it throws an error. If not, it creates a new
Variablenode and adds this variable to the context’s map of local variables. - When it sees an identifier used in an expression, it checks the context to make sure it has been declared. If not, it throws an error. If it has, it replaces the identifier with a link to the variable being referred to.
For the sample program above, the semantically decorated AST is now:
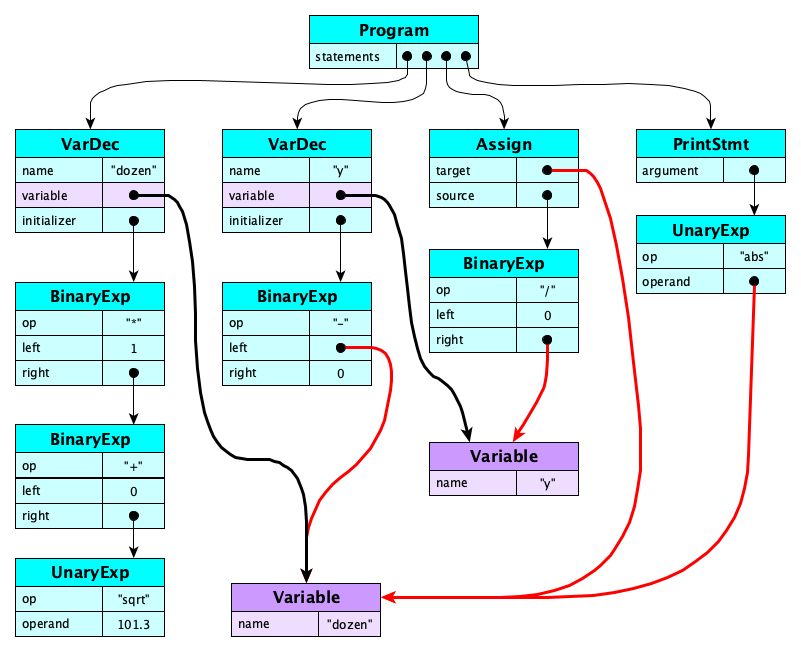
More complex languages would do type checking, access-level (private vs. public checking), function argument checking, and much, much more.
Study the complete semantic analyzer module now.
Study the complete analyzer test suite now.
The Optimizer
Because this is a teaching example, this compiler does a handful of optimizations on the analyzed AST. (In modern compilers, many of these optimizations are done in LLVM, but that shouldn’t stop us from trying them out on the AST!)
Here are the optimizations the little compiler can do:
- For binary expressions where $c_1$ and $c_2$ are constants, and $e$ is any expression:
- $(\mathsf{BinaryExp}\;+\;c_1\;c_2) ⟶ c_1\!+\!c_2$
- $(\mathsf{BinaryExp}\;-\;c_1\;c_2) ⟶ c_1\!-\!c_2$
- $(\mathsf{BinaryExp}\;*\;c_1\;c_2) ⟶ c_1\!*\!c_2$
- $(\mathsf{BinaryExp}\;/\;c_1\;c_2) ⟶ c_1/c_2$
- $(\mathsf{BinaryExp}\;+\;0\;e) ⟶ e$
- $(\mathsf{BinaryExp}\;*\;1\;e) ⟶ e$
- $(\mathsf{BinaryExp}\;-\;0\;e) ⟶ (\mathsf{UnaryExp}\;-\;e)$
- $(\mathsf{BinaryExp}\;*\;0\;e) ⟶ 0$
- $(\mathsf{BinaryExp}\;\,/\;0\;e) ⟶ 0$
- $(\mathsf{BinaryExp}\;*\;e\;0) ⟶ 0$
- $(\mathsf{BinaryExp}\;+\;e\;0) ⟶ e$
- $(\mathsf{BinaryExp}\;-\;e\;0) ⟶ e$
- $(\mathsf{BinaryExp}\;*\;e\;1) ⟶ e$
- $(\mathsf{BinaryExp}\;\,/\;e\;1) ⟶ e$
- For unary expressions where $c$ is a constant:
- $(\mathsf{UnaryExp}\;-\;c) ⟶ -c$
- $(\mathsf{UnaryExp}\;\mathsf{abs}\;c) ⟶ |c|$
- $(\mathsf{UnaryExp}\;\mathsf{sqrt}\;c) ⟶ \sqrt{c}$
- For an assignment statement of the form $x = x$ (where the target and source are the same identifier), remove this statement, as it effectively does nothing.
The optimizer works by walking the analyzed AST, replacing each subtree with an optimized version if applicable. Here’s what the simple optimizer produces for our running example:
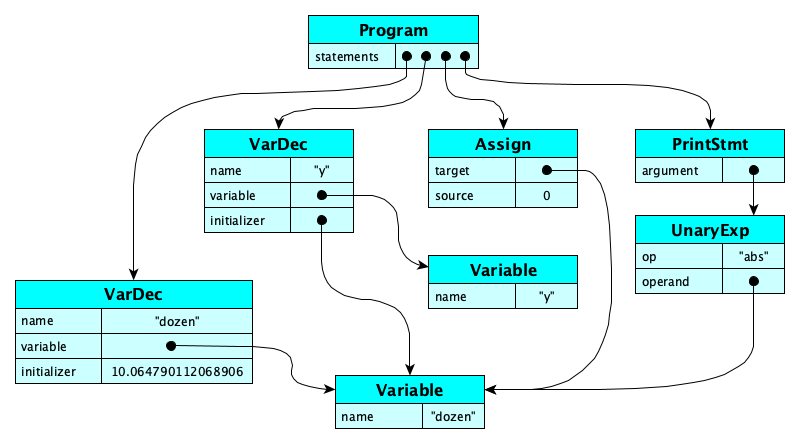
A more aggressive optimizer could have done much better! But we are keeping this example light as this is our first compiler.
Study the complete optimizer module now.
Study the complete optimizer test suite now.
The JavaScript Generator
Our compiler has three code generators. The first one, and the simplest, just emits JavaScript code. It’s only a few dozen lines and fairly easy to study. The most interesting part is perhaps how we mangle the Ael names to produce JavaScript names.
Study the JavaScript code generator now. Find and study the associated unit tests, too.
The C Generator
If you’ve studied the JavaScript generator, the C one will be easy to follow.
Study the C code generator now. Find and study the associated unit tests, too.
The LLVM IR Generator
There is so, so much to learn about LLVM. That is for another day. But it’s really neat, you’ll love it. For now, just browse the source code for the LLVM generator and the tests. No need to spend a lot of time on it now.
Summary
We’ve covered:
- How to organize a project for a compiler written in Node.js
- A refresher of setting up READMEs on GitHub
- A refresher on package.json
- Configuring and using Prettier
- How the compiler is launched
- How to write a compiler, including its unit tests