A Tour of Basic JavaScript
Where We’ve Been
In the previous unit, we learned:
- How to write and run a JavaScript program using the P5 Web Editor
- What variables and functions are, and why we need them
- The importance of careful naming and of separation of concerns
- How to do simple drawing and animation using the P5.js library
And you’ve gotten started on writing your own plane-landing animation. You're on your way! Now, let’s ramp up our repertoire of programming knowlege and hone some new skills.
Where We’re Going
This tour will use example programs to motivate, introduce, and illustrate concepts. This is because context and clarity is important in learning. We’ll learn with in-class code-alongs, leaving you to extend and enhance the programs we build together for your homework, classwork, and self-study. Try out at least some of these extensions with friends; you don’t have to do everything alone, but you must do some work alone to develop self-sufficiency skills. Balance all things in life.
In a future unit, we will take a more academic approach and look at JavaScript, the language, more holistically.
Sketching
The programs we’ve seen up until now—the UFO program and your plane lander—aren’t interactive. Let’s look at some features of P5.js that are. Our next code-along is an interactive sketching program, adapted from an example in the P5 documentation. It makes use of three variables defined inside the P5 library whose names are pretty explanatory: mouseIsPressed, which has the value true whenever the ”mouse button” is down, and mouseX and mouseY which hold the current coordinates of the “mouse”. Create a new project in the P5 Web Editor (select New from the File menu). We’ll be coding along to make the following:
function setup() {
  createCanvas(300, 300)
  background('linen')
}

function draw() {
  if (mouseIsPressed) {
    circle(mouseX, mouseY, 30)
  }
}
background function were put into draw instead of setup.
Let’s pretty this up a bit. We’ll allow for colorful circle drawing without the mouse button being pressed, while repurposing the mouse press to “clear the canvas”:
function setup() {
  createCanvas(300, 400)
  background('black')
  noStroke()
}

function draw() {
  if (movedX !== 0 || movedY !== 0) {
    fill(random(256), random(256), random(256), 70)
    circle(mouseX, mouseY, random(3, 100))
  }
}

function mousePressed() {
  background('black')
}
We’ll explain the new concepts in class:
- The RGBA color system
- The special variables
movedXandmovedY - The
randomfunction - The function
mousePressed(P5 isn’t justsetupanddraw)
You should read about these in the P5 reference, too!
mouseIsPressed versus mousePressed. Try to articulate the difference between them in words. Make sure to check the P5 documentation to see how the professional technical writers explain them.
One more, this time sketching with lines rather than circles, and a different color mode, HSB.
let hue = 0

function setup() {
  createCanvas(400, 400)
  background('black')
  colorMode(HSB, 360, 100, 100)
  strokeWeight(8)
}

function mouseDragged() {
  hue += 1
  if (hue >= 360) {
    hue = 0
  }
  stroke(hue, 100, 100)
  line(pmouseX, pmouseY, mouseX, mouseY)
}
We’ll go over that new stuff in class during our code along. There was a lot there:
- The
mouseDraggedfunction, called whenever you, well you know, right? - The
pmouseXandpmouseYbuilt-in variables, holding the previous (get it? “p” is for “previous”) coordinates of the mouse - HSB colors! (We’ll visit this tutorial during our code along.)
Get creative! Go browse the P5 reference and pick up some cool-looking things for enhancing one of these three sketching programs even further. Build something cool. Share your creations with your classmates. Some things to consider: varying the weight of the lines, varying the saturation or brightness of the lines, drawing with different shapes. Use this time as an opportunity to explore the reference material and perhaps get inspired.
We can sketch with the keyboard arrow keys too. Next code-along:
let x, y

function setup() {
  createCanvas(400, 580)
  background('black')
  stroke('hotpink')
  strokeWeight(8)
  x = width / 2
  y = height / 2
}

function keyPressed() {
  let [oldX, oldY] = [x, y]
  if (keyCode == UP_ARROW) {
    y -= 10
  } else if (keyCode === DOWN_ARROW) {
    y += 10
  } else if (keyCode === LEFT_ARROW) {
    x -= 10
  } else if (keyCode === RIGHT_ARROW) {
    x += 10
  }
  x = constrain(x, 0, width)
  y = constrain(y, 0, height)
  line(oldX, oldY, x, y)
  return false
}
This program introduced:
keyPressedconstrain- A JavaScript nice thing: binding two variables at once
- Not being able to rely on
pMouseXandpMouseY
That code can still use a lot of work! That annoying value 10 is repeated over and over. That is not nice. Fix it up! Make it better!
Gravity
Let’s make a fun animation of raindrops. We’ll start with one raindrop that begins at the top of the canvas at a random x position and falls at a random speed. The speed of the raindrop is the number of pixels that we increase the raindrop’s y-position for each frame. If raindrops fell at a constant speed, then our draw function would contain:
y += speed
But we want the speed itself to increase at each frame! So we need to have the following:
  y += speed
  speed += gravity
Here is the completed app we will build together in our code-along (note the use of a JavaScript object to bundle together the position and speed of the raindrop):
let raindrop
let gravity = 0.2

function setup() {
  createCanvas(300, 480)
  fill('blue')
  setRaindropAtTop()
}

function draw() {
  background('lightgray')
  circle(raindrop.x, raindrop.y, 10)
  raindrop.y += raindrop.speed
  raindrop.speed += gravity
  if (raindrop.y > height) {
    setRaindropAtTop()
  }
}

function setRaindropAtTop() {
  raindrop = { x: random(width), y: 0, speed: 0.05 }
}
That 10 in the code above is a “magic number.” Clean it up. (Hint: it’s the diameter of the raindrop, so where should you store it?) Try to implement raindrops of varying sizes. And now that you learned about HSB colors in a previous code-along, make each raindrop have its own shade of blue.
Make an interactive ball drop program. You hold a ball at the mouse position and move it around freely, but when you click, you “let go” of the ball and it falls. After it passes the bottom of the canvas, you then hold a new ball. You can view my solution here, which illustrates the P5 cursor function providing a nice effect of a hand grabbing and releasing the ball.
Arrays
Now suppose we wanted to animate hundreds of raindrops. Do we need variables raindrop1, raindrop2, raindrop3, raindrop4, and so on? Hopefully not!
Just like we bundled together the x, y, and speed properties in a previous code-along to make a single object, we can bundle together a bunch of similar objects into an array. Our next code-along will introduce arrays:
let raindrops = []
let gravity = 0.2

function setup() {
  createCanvas(300, 580)
  fill('blue')
  while (raindrops.length < 50) {
    raindrops.push({ x: width / 2, y: 0, speed: 0 })
  }
}

function draw() {
  background('lightgray')
  for (let raindrop of raindrops) {
    circle(raindrop.x, raindrop.y, 10)
    raindrop.y += raindrop.speed
    raindrop.speed += gravity
    if (raindrop.y > height) {
      raindrop.x = random(width)
      raindrop.y = random(-500, 0)
      raindrop.speed = random(5, 10)
    }
  }
}
There is so much to cover in this code-along!
Extend by adding clouds at the top of the screen, a grassy field at the bottom, and let each raindrop stop at a random y-position on the grass (perhaps with a splash effect) to make your animation appear three-dimensional.
Classes
We’ve seen how to bundle properties (e.g., x, y, speed) together to make up the state of an object, but what if we could also bundle together the behavior of an object, together with the state, so we have “everything about the object (state and behavior in one place”). JavaScript provides classes as a way to bundle state and behavior together. Classes give you the sense that objects aren’t just bundles of data properties, but actual active entities in the world.
As in the previous code-along, there is a great deal about JavaScript that needs to be introduced here. We’ll end up with the following:
let raindrops = []
let gravity = 0.2

function setup() {
  createCanvas(300, 580)
  fill('blue')
  while (raindrops.length < 50) {
    raindrops.push(new Raindrop())
  }
}

function draw() {
  background('lightgray')
  for (let raindrop of raindrops) {
    raindrop.show()
    raindrop.fall()
  }
}

class Raindrop {
  constructor() {
    this.setToTop()
  }
  setToTop() {
    this.x = random(width)
    this.y = random(-800, 0)
    this.speed = random(5, 10)
  }
  show() {
    circle(this.x, this.y, 10)
  }
  fall() {
    this.y += this.speed
    this.speed += gravity
    if (this.y > height) {
      this.setToTop()
    }
  }
}
Stretch Challenge: Check the P5 Reference for information on curves. See if you can craft a raindrop that looks more like, well, a raindrop.
Using the Console
The area we’ve been drawing into up to now is known as the browser’s document. But your browser also comes with a console. Generally, the document is your app, and the console is a place to write informative messages that your users might not be interested in. Sometimes, however, the console is the right place for your output! Maybe your program just manipulates numbers or text, and no graphics are needed.
Your Lottery Odds
Suppose a lottery game picks six distinct numbers from the set 1..53. How likely it is that your six numbers come up? We know there are 53 ways to pick the first number, 52 ways to pick the second, 51 for the third, and so on. The total number of possible combinations is thus 53 × 52 × 51 × 50 × 49 × 48. Create a new project in the P5 Web Editor and replace the entire starter code with:
console.log(53 * 52 * 51 * 50 * 49 * 48)
You should see:
16529385600
Let’s now embed our computation in a friendly message. In JavaScript, we enclose text in backticks, and embed computed values between ${ and }. Edit the program to read as follows:
console.log(`Your odds are ${53 * 52 * 51 * 50 * 49 * 48} to 1`)
You should see:
Your odds are 16529385600 to 1
${ and the }. Then actually remove the characters and re-run your code to see if you were right! Then put the program back together. 😀
Separation of Concerns, Again
Our new program has friendlier output, but its one line of code has too much going on. Programs should be readable! Remember separation of concerns from our UFO code-along? We add clarity by separating the code into two parts: (1) the computation and the (2) display. Let’s choose a good name for our computed value:
const odds = 53 * 52 * 51 * 50 * 49 * 48
console.log(`Your odds are ${odds} to 1`)
You still should see:
Your odds are 16529385600 to 1
Locales
Time for the next improvement! The display of numbers, as well as dates and currencies, are culturally dependent and can be tuned to the locale of the browser. Edit your program to:
const odds = 53 * 52 * 51 * 50 * 49 * 48
console.log(`Your odds are ${odds.toLocaleString()} to 1`)
Did you see an improvement? The number should be formatted according to the customs of the country or region your computer was set up for. But we can also tell the program to use the locale of our choosing. Let’s make the output familiar to users that speak German (de) and live in Germany (DE):
const odds = 53 * 52 * 51 * 50 * 49 * 48
console.log(`Your odds are ${odds.toLocaleString('de-DE')} to 1`)
Your odds are 16.529.385.600 to 1
ar-EG. Also try en-US, hi-IN, es-ES, and es-MX.
Here’s what you should see for ar-EG:
Your odds are ١٦٬٥٢٩٬٣٨٥٬٦٠٠ to 1


Numbers in general are fascinating. Watch:
More Practice
Try this one:
const city = 'Los Angeles'
const month = 'February'
console.log(`I like ${city} in ${month}, how about you?`)
I like Los Angeles in February, how about you?And this one:
const sentence = 'Once I heard a JavaScript talk in Gaborone'
console.log(sentence.toUpperCase())
console.log(sentence.toLowerCase())
ONCE I HEARD A JAVASCRIPT TALK IN GABARONE
once i heard a javascript talk in gabarone
The Actual Browser Console
The P5 Web Editor does a nice thing by giving you a console right under your code. But this is just a convenient view into the browser’s real console. At this point in class, we’ll locate the real console and re-do the last few code-alongs in the real console. Interestingly, despite being essential to JavaScript programming, finding the browser console isn’t always easy: it depends on your operating system and your browser. The F12 key usually works, but see this guide or search the web if you are having trouble.
Why is it called console.log?
Larger programs tend to do a lot of writing messages describing what they are doing, they are keeping a log of their activities. Writing to the console is thus generally called logging. If you are using P5, there’s a shortcut: you can say
REPL Style
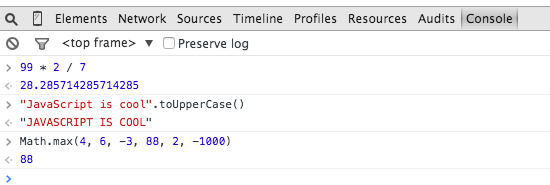
The actual browser console is not just a place for your program to write things, you can can use it to write and execute code in it as well. Like a dialogue! You type in a line of code, and the console Reads your line, then Evaluates the line, then Prints the result, then Loops back to read the next line. The console is a REPL. In class, we’re going to try this out.
You will surely someday find yourself taking advantage of this little gem while studying—and when debugging!
HTML and CSS
P5 is amazing, right? But you know, these lovely little creative sketches and games look a little bit different from the “web apps” you’re used to, right? In our next two code-alongs, we’re going to leave P5 and build apps using no supporting libraries at all.
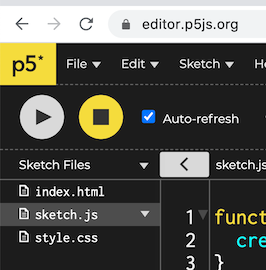
In the P5 web editor, create a new project. Open up the left sidebar and notice something interesting: browser-based programs come with three starter files: index.html, style.css, and sketch.css. The HTML file is the real starting point; it defines the structure of the browser’s document. At this point of our in-class code-along, we’ll study the “starter code” HTML file, and the associated CSS and JS files.
This is the part where we study in class.
Okay, that was fun. Now, let’s write a webapp!
The HTML
We’re going to build a program for converting inches to centimers. Let’s begin with rewriting the index.html file to:
<!DOCTYPE html>
<html lang="en">
  <head>
    <meta charset="utf-8" />
    <link rel="stylesheet" href="style.css">
  </head>
  <body>
    <h1>Distance Converter</h1>
    <p>
      <input id="in"> in =
      <span id="cm">?</span> cm
    </p>
    <script src="sketch.js"></script>
  </body>
</html>
An HTML file only states what elements should appear in your document: in this case a level-one heading (h1) and a paragraph (p) containing a text input box (input), some text, and a span element. Elements are denoted with tags (often both a start tag and an end tag); elements can also have attributes (if present, you can see them in the start tag). The HTML file does not define how the elements look (execept for the very, very built-in “default” styling) nor how they behave. HTML is pure structure. Visualize the structure as a tree:
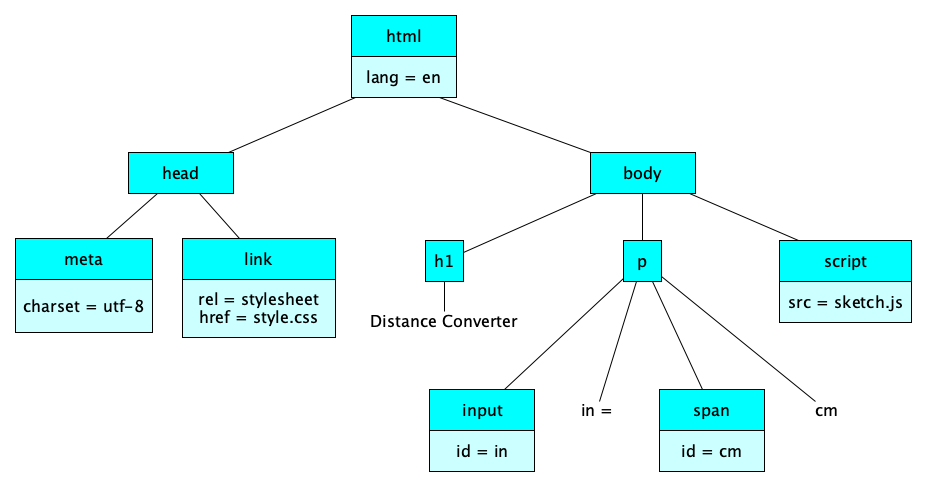
The structure of the elements you see here — this tree — is called the DOM. DOM is short for Document Object Model. That’s because what browser’s show you is a document, and the document is made up of objects (well, elements really, but the name “object” stuck), and the HTML provodes a structure, or model, or how the objects fit together. Best to get used to calling it ”the DOM,” as that’s what everyone calls it.
Interested in Computer Science?
If so, you should get used to trees. They are ubiquitious in all areas of computer science.
The CSS
HTML defines only the structure of an app; CSS defines its presentation, sometimes called the look-and-feel. What do we mean by presentation? Lots of things:
- Text and Fonts
- Layout, Position, Alignment
- Border, Margins, Padding
- Colors
- Backgrounds
- Image Processing
- Scrolling and Overflow
- Paging
- Masking
- Transformations
- Transitions
- Audio and Speech
Our code-along will only show simple styles for now; we will end up with this:
body {
  margin: 0;
  padding: 0;
  background-color: skyblue;
}
h1 {
  background-color: blue;
  color: white;
  margin-top: 0;
  padding: 20px;
  font-family: cursive;
}
p {
  margin-left: 20px;
}
Things will get derived and explained as we code-along.
The JavaScript
So HTML is for structure and CSS is for presentation. JavaScript is for behavior. JavaScript is a popular and powerful programming language, but when used in a browser, most programs end up saying the following over and over:
When event X occurs, perform action Y
In our simple distance-coverter app, we want to say:
When anything is input in our text box, update the span with the new computed value.
Here’s the JavaScript code we will build and explain in the code-along:
const inputBox = document.querySelector('#in')
const answerSpan = document.querySelector('#cm')

inputBox.addEventListener('input', report)

function report() {
  const inches = inputBox.value
  const centimeters = inches * 2.54
  if (isNaN(centimeters)) {
    answerSpan.textContent = '?'
  } else {
    answerSpan.textContent = centimeters
  }
}
So important it is worth restating
- HTML is for content / structure
- CSS is for styling / presentation
- JavaScript is for interaction / behavior
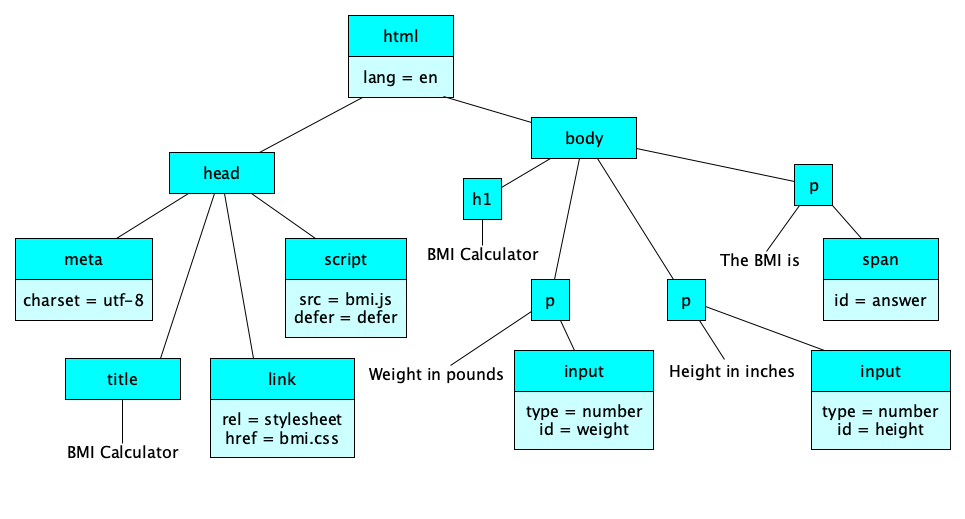
A Slightly More Complex App
Our next code-along will be a little fancier. We’ll have two input boxes. 😮
<!doctype html>
<html lang="en">
  <head>
    <meta charset="utf-8">
    <title>BMI Calculator</title>
    <link rel="stylesheet" href="bmi.css">
    <script src="bmi.js" defer></script>
  <head>
  <body>
    <h1>BMI Calculator</h1>
    <p>Weight in pounds <input id="weight"></p>
    <p>Height in inches <input id="height"></p>
    <p>The BMI is <span id="answer"></span></p>
  </body>
</html>
Our code-along will end up with the following JavaScript:
const KILOGRAMS_PER_POUND = 0.453592
const METERS_PER_INCH = 0.0254

const heightBox = document.querySelector('#height')
const weightBox = document.querySelector('#weight')
const answerSpan = document.querySelector('#answer')

heightBox.addEventListener('input', updateBMI)
weightBox.addEventListener('input', updateBMI)

function updateBMI() {
  const pounds = Number(weightBox.value)
  const inches = Number(heightBox.value)
  const kilograms = pounds * KILOGRAMS_PER_POUND
  const meters = inches * METERS_PER_INCH
  const bmi = kilograms / (meters * meters)
  answerSpan.textContent = bmi.toFixed(2)
}
This code along is great opportunity to learn about some technical aspects of JavaScript and programming!
In groups of 2-4, extend this BMI application with some enhanced styling (try a background image, some borders, better colors, different fonts, and so on). In the HTML file, try type="number" as an attribute for both of the input elements. See if you can line up the text entry boxes (we haven’t covered this in class, so ask around or search the web, surely CSS has something that might help).
Fancy Styling
It seems fitting to take a sneak peak at some of the things you can do with CSS before moving on. Our next code-along will show a message on a rainbow background with some crazy font decorations and rotation. Think of this as a base for exploring CSS, not as a recommended way to style up text in a “real” webapp.
body {
  font: bold italic 50px Avenir, Helvetica;
  color: white;
  text-shadow: 1px 1px 2px black;
  text-align: center;
  background-image: linear-gradient(90deg, red, yellow, orange, green, blue, purple);
  padding-top: 50px;
  transform: rotate(-5deg);
}
Speaking of being creative, go ahead and experiment with styles and text. There are several places on the web with tutorials and references for CSS; The HTML Dog CSS Properties reference page is fabulous. More complete coverage of CSS will come later in the course.
Be careful with styling. There are a number of things you need to be aware of, such as not using color to carry meaning (some users may have degrees of color-blindness) and don’t use pictures for text (as some visually-impaired users may require screen readers). Styling can be overdone and detract from your message. However, styling can enhance usability and the user experience, so by all means learn and practice how to style well.
Let’s Review What We’ve Seen So Far
Remember: HTML defines the structure, the content, the DOM, which is made up of elements and attributes. CSS adds styles, or presentation, to the DOM elements. JavaScript attaches behavior to the DOM elements, usually by adding event listeners. However, JavaScript can also add elements to and remove elements from the DOM, and it can even change styles!
Here are the essential elements, CSS properties, and JavaScript events we’ve covered so far. How many do you recall?
| HTML | CSS | JavaScript |
|---|---|---|
ELEMENTS:
|
PROPERTIES:
|
FUNCTIONS:
PROPERTIES:
EVENTS:
|
element.style.color = 'red'.
Events are one of JavaScript’s signature capabilities
JavaScript is known for being all about events. The set of events a JavaScript program can listen for and respond to is set by the environment (browser, mobile device, server, etc.) and programmers can create their own events, too. Here are some events you may encounter:There are hundreds more.
input, when the text inside an element changes (by typing, cutting, pasting, etc.)keydown, when a key has been pressed downmouseenter, when the mouse cursor has been moved into the bounding box of the elementopen, when a web socket connection has been establishedtouchend, when a touchpoint has been removed from a touch surface
P5 and JavaScript
So JavaScript in the browser involves manipulating elements in the DOM that are defined by HTML and styled by CSS. So how is P5 a JavaScript library? What is it actually doing behind the scenes?
It turns out that among the hundred or so built-in HTML elements, there’s a powerful element called canvas, which you draw in with...JavaScript! When you bring in the P5 library in your HTML file, the P5 script actually adds a new canvas element to your DOM and adds a bunch of functions that make writing to the canvas much, much, much easier than the low-level canvas drawing functions built-in to the browser.
We’re going to use the browser inspector to find the canvas added by the P5 library. For now, we will only care that it is there.
And now for a last code-along on this page. We’re going to use both P5 and “vanilla” JavaScript in the same app! Oooooh. Here’s what we will build:
Check out the completed application online.
I want to learn more!
Interested in P5? Interested in JavaScript?
Summary
We’ve covered:
- Reacting to the mouse
- Reacting to the keyboard
- Gravity
- Arrays
- Classes
- Writing to the Console
- Writing programs without P5
- The relationship between HTML, CSS, and JavaScript
- What The DOM is
- A few HTML elements and attributes
- Some very basic CSS