Java Webapps Tutorial
Here is a tutorial for writing very simple web applications in Java using the Tomcat server. No special IDEs or tools are required: we do everything on the shell's command line. Later stages of the tutorial introduce spring, ant, and maven. Readers are assumed to be decent Java programmers and know the basics of HTTP.
1. Get Tomcat
Download and install Tomcat (version 6 or later).
Set the environment variable CATALINA_HOME to the install directory. While you're at it, make sure this variable always gets set at system startup.
Familiarize yourself with the installation structure:
    $CATALINA_HOME
        |__ bin         Scripts, including startup and shutdown
        |__ conf        Config files for tomcat (that you can tweak!)
        |__ lib         Libraries used when Tomcat is running
        |__ webapps     Put your webapps under here
        |     |__ ...       (each subdirectory is a webapp)
        |__ logs        Tomcat writes its logs here (empty on fresh install)
        |__ work        Tomcat writes stuff here (empty on fresh install)
        |__ temp        Tomcat writes stuff here
Although you will never write to logs and work
yourself, you'll become pretty familiar with looking inside these
directories to debug your webapps (more on this later).
2. Start Tomcat
On Unix
$CATALINA_HOME/bin/startup.sh
or on Windows:
%CATALINA_HOME%\bin\startup.bat
This runs tomcat on port 8080 (unless you've changed config files). It also generates a bunch of log files (they will all have the current date as part of their name).
A whole bunch of webapps are already pre-installed with tomcat; if you look in the webapps directory you will see:
    $CATALINA_HOME
        |__ webapps
        |     |__ ROOT
        |     |__ docs
        |     |__ examples
        |     |__ manager
        |     |__ host-manager
        |__ ...
You can run these webapps by pointing your browser to these uris:
http://localhost:8080/                       (runs ROOT)
http://localhost:8080/docs/                  (runs docs)
http://localhost:8080/examples/              (runs examples)
http://localhost:8080/manager/               (runs manager)
http://localhost:8080/host-manager/          (runs host-manager)
(You might notice that the last two give errors, because they are disabled by default.)
3. Write a trivial webapp of your own
Create a new directory under $CATALINA_HOME/webapps called hello.
Under this directory make a file called index.html
with the following contents:
<html>
  <head>
    <title>Hi</title>
  </head>
  <body>
    <p>Hello</p>
  </body>
</html>
Yes, this single file constitutes a real webapp, albeit a boring one. Run it by going to:
http://localhost:8080/hello/index.html
Tomcat treats index.html specially (at least by default), so you can also go run this webapp by going to:
http://localhost:8080/hello/
4. Write a trivial servlet-based webapp
The previous webapp one really wasn't a Java webapp. Real Java webapps are built along the lines of the Servlet Specification. A webapp is usually part of a larger enterprise application. The (one and only) framework for Java enterprise applications is called Java Platform, Enterprise Edition, or Java EE. The main competitor to Java EE is .NET (dot net).
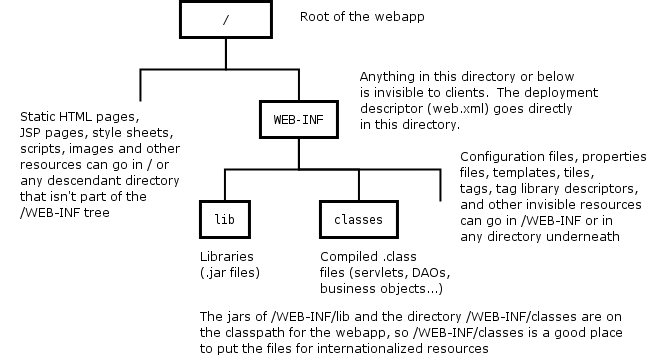
4.1 Understand the required structure of Java webapps
Java webapps are required to have the following structure:
Let's extend our existing "hello" webapp to include servlets. Once you start including servlets you will also need a web.xml file. We will be adding two files
- A web.xml file (goes right under WEB-INF), and
- A servlet called com.example.jwt.NowServlet that returns a greeting page with the current time (formatted according to a user-specified format string passed as a uri parameter) and some server information
When these two files are added to the existing webapp (which currently contains only index.html), we'll have the following:
    $CATALINA_HOME
        |__ webapps
        |   |__ hello ---- index.html
        |   |     |__ WEB-INF ---- web.xml
        .   |           |__ classes
        .   .                 |__ com
        .   .                       |__ example
            .                             |__ jwt ---- NowServlet.class
Note that because the servlet is in the package com.example.jwt, we have to place the class file under com/example/jwt relative to a classpath entry (in this case WEB-INF/classes).
4.2 Write a web.xml file
The web.xml file will map the url "now" to the class com.example.jwt.NowServlet. It will look like this:
<web-app xmlns="http://java.sun.com/xml/ns/j2ee"
  xmlns:xsi="http://www.w3.org/2001/XMLSchema-instance"
  xsi:schemaLocation="http://java.sun.com/xml/ns/j2ee
  http://java.sun.com/xml/ns/j2ee/web-app_2_4.xsd"
  version="2.4">
  <display-name>The Hello Webapp</display-name>
  <servlet>
    <servlet-name>now</servlet-name>
    <servlet-class>com.example.jwt.NowServlet</servlet-class>
  </servlet>
  <servlet-mapping>
    <servlet-name>now</servlet-name>
    <url-pattern>/now</url-pattern>
  </servlet-mapping>
</web-app>
4.3 Write a servlet
You'll write the source code of the servlet in Java. Don't put the Java source in the webapps directory! Keep your sources in some workspace; you can compile from there into the webapp if you want. The source code for the servlet is:
package com.example.jwt;

import java.io.IOException;
import java.io.PrintWriter;
import java.text.DateFormat;
import java.text.SimpleDateFormat;
import java.util.Date;

import javax.servlet.http.HttpServlet;
import javax.servlet.http.HttpServletRequest;
import javax.servlet.http.HttpServletResponse;

/**
 * A servlet that generates an HTML page with the current date,
 * formatted according to the HTTP parameter "format".  If the
 * format parameter is missing or invalid, "yyyy-MM-ddTHH:mm:ss"
 * is assumed.
 */
public class NowServlet extends HttpServlet {

    @Override
    public void doGet(HttpServletRequest request, HttpServletResponse
            response) throws IOException {
        PrintWriter out = response.getWriter();
        out.println("<html><head><title>The Date Service</title></head>");
        DateFormat dateFormat;
        try {
            dateFormat = new SimpleDateFormat(request.getParameter("format"));
        } catch (Exception e) {
            dateFormat = new SimpleDateFormat("yyyy-MM-dd'T'HH:MM:ss");
        }
        String date = dateFormat.format(new Date());
        out.println("<body><p>Hi, it's " + date + "</p>");
        out.println(getServletContext().getServerInfo() + "</body></html>");
        out.close();
    }
}
4.4 Compile the servlet into the webapp
Make sure you compile with servlet-api.jar on your classpath (since that is where the javax.servlet.* classes reside). Fortunately that jar comes with Tomcat, so assuming your current directory was the root of your Java sources, you can say
javac -cp .:$CATALINA_HOME/lib/servlet-api.jar -d $CATALINA_HOME/webapps/hello/WEB-INF/classes com/example/jwt/NowServlet.java
on Unix, or
javac -cp .;%CATALINA_HOME%\lib\servlet-api.jar -d %CATALINA_HOME%\webapps\hello\WEB-INF\classes com\example\jwt\NowServlet.java
on Windows. This places the class file in the webapp in the right place.
4.5 Try it out
You will probably have to shutdown and restart tomcat to get it to load the servlet. Test your webapp using a few uris such as
http://localhost:8080/hello/now
http://localhost:8080/hello/now?format=MM/dd/yyyy
http://localhost:8080/hello/now?format=HH:mm
http://localhost:8080/hello/now?format=EEEE
http://localhost:8080/hello/now?format=gfrgewrgwegweg
5. Separate business and display logic
All that mixing of business logic and display logic in the servlet is a bad idea. The servlet (the controller) should do its computations, then forward results (the model) to something that generates the presentation (the view).
Interestingly, there is a special servlet you don't have
to declare in your web.xml file called a "JspServlet", which is
invoked for uris ending in ".jsp". A JSP, or Java Server Page
is usually just an HTML file with slots for variables. Create
a file called now.jsp (under the new directory WEB-INF/tiles)
<html>
  <head><title>Today</title></head>
  <body>
    <p>Hello, it is now ${date}</p>
    <p>So says: ${info}</p>
  </body>
</html>
giving
    $CATALINA_HOME
        |__ webapps
        |   |__ hello ---- index.html
        |   |   |__ WEB-INF ---- web.xml
        |   |       |__ tiles ---- now.jsp
        .   |       |__ classes
        .   .           |__ com
        .   .               |__ example
            .                   |__ jwt ---- NowServlet.class
Then modify the servlet so it simply computes the date and server info strings, writes them to the request, then forwards to this jsp:
package com.example.jwt;

import java.io.IOException;
import java.text.DateFormat;
import java.text.SimpleDateFormat;
import java.util.Date;

import javax.servlet.ServletException;
import javax.servlet.http.HttpServlet;
import javax.servlet.http.HttpServletRequest;
import javax.servlet.http.HttpServletResponse;

/**
 * A servlet that generates an HTML page with the current date,
 * formatted according to the HTTP parameter "format".  If the
 * format parameter is missing or invalid, "yyyy-MM-dd'T'HH:mm:ss"
 * is assumed.
 */
public class NowServlet extends HttpServlet {

    @Override
    public void doGet(HttpServletRequest request, HttpServletResponse
            response) throws IOException, ServletException {
        DateFormat dateFormat;
        try {
            dateFormat = new SimpleDateFormat(request.getParameter("format"));
        } catch (Exception e) {
            dateFormat = new SimpleDateFormat("yyyy-MM-dd'T'HH:MM:ss");
        }
        request.setAttribute("date", dateFormat.format(new Date()));
        request.setAttribute("info", getServletContext().getServerInfo());
        request.getRequestDispatcher("WEB-INF/tiles/now.jsp").forward(
                request, response);
    }
}
Compile the servlet and copy the class file into the webapp's deployment area. You may have to restart tomcat.
6. Organize a source workspace and start using build scripts
Real webapps can get really complex, with dozens to hundreds of Java classes, server pages, properties files, images and other media, etc. Note that your source code workspace will contain things like Java source code files and unit tests that never make it into the deployed webapp. Also, things like the compiled class files belong in the deployed webapp but you won't be checking these into CVS.
Because the sources are so different from the deployed webapp, we want to build source workspaces separate from the deployment directories and write scripts to compile and deploy. So let's build a source workspace. Do it like this:
    <project_root_dir>
      |__ src
      |     |__ main
      |     |     |__ java
      |     |     |__ resources
      |     |     |__ webapp
      |     |           |__ images
      |     |           |__ styles
      |     |           |__ scripts
      |     |           |__ WEB-INF
      |     |                 |__ conf
      |     |                 |__ tld
      |     |                 |__ tags
      |     |                 |__ tiles
      |     |__ test
      |           |__ java
      |__ target
The idea is to store under src everything you'd save in CVS (or similar repository), then have scripts that
- Compile all of the java files under src, placing the compiled class files under target.
- Run all unit tests.
- Copy resource and configuration data that is under src to similar places under target.
- Zip everything under target into a single file, called a war file.
- Copy the war file into $CATALINA_HOME/webapps (this is called deployment).
...
7. Start Planning a Complex Webapp
7.1 Define the Purpose of the Webapp
7.2 Describe the "API" of the Webapp as a Set of URIs
7.3 Organize the Source Directories
7.4 Write a Build Script
8. Get Spring
For large webapps an application framework like Spring is a must. Rather than pointing out the million ways in which Spring simplifies your life, we'll get right into making a new webapp with it. We're going to make a webapp around a database of movie information.