Introduction to Git
Why Git?
Most people learn quickly why they need version control. Of the many version control systems out there, Git is one of the most popular.
Before you go any further, read Chapter 1 of the Git Book to learn about version control in general, a little bit of Git’s history, how to install and set up Git, what Git can do, and where to get help. Jumping right in without some of this background may lead to frustration down the road.
About these notesPlease understand these notes are only introductory, and that you need to know about, and use, the official git documentation. Please be aware of, and browse:
Again, read Chapter 1 of the book now. Maybe watch some of the videos too.
- The Git Home Page
- The Git Documentation Page. This page has links to a reference manual, an absolutely wonderful free online book, cheat sheets, and training videos.
Git vs. GitHub
Let’s get this distinction out of the way right now:
- Git is a version control program. It runs on your laptop, letting you manage your development history.
- GitHub, GitLab, and BitBucket are cloud hosting services for Git repositories.
Getting Set Up
GitHub
GitHub is the most popular of the cloud services, so you’ll want to “have a GitHub” even if you also use the other services. Sign up for an account if you don’t already have one. Log in and stay logged in.
OPTIONAL: Go to your Settings and set up SSH access. Don’t know what that is? That’s fine; you can always do that later.
Git
Let’s get set up with Git. After this exercise, you will be able to work with git on your own desktop or laptop.
- Make sure the program
gitis installed on your machine.- If you are using Windows: go to the Git Downloads Page and click on the Windows Download link. During the installation, you will see a dialog with options “Use Git from Git Bash only” or “Git from the command line and also from 3rd-party software”. Choose the latter. Finish the installation.
- Once installed, you should close any open existing Windows terminals. After reopening them, you can now use the
gitcommand from your native Windows Terminal. - The installation also gives you a new application called Git Bash. This application is a whole new terminal! This terminal not only gives you git, but also Bash, the command line scripting language and environment used by the non-Windows world.
- Once installed, you should close any open existing Windows terminals. After reopening them, you can now use the
- If you are not using Windows (Mac, Linux, Unix, etc.): Git is probably already installed. If not, grab it from the Git Downloads Page and install, or if you know a package manager (e.g., Homebrew) feel free to use that. Upgrade to the latest version to make sure you have the newest features.
- If you are using Windows: go to the Git Downloads Page and click on the Windows Download link. During the installation, you will see a dialog with options “Use Git from Git Bash only” or “Git from the command line and also from 3rd-party software”. Choose the latter. Finish the installation.
- Type
gitin your terminal to see if it is already there or not. You should know by the output whether the program was successfully installed or not. If it was not, or you are not sure, ask the instructor or a TA for help. - Do this one-time setup (one time for each machine you will be running git on, that is). Enter the following three commands, substituting the name and email below with your own (use the same email you used when creating your GitHub account earlier):
$ git config --global user.name "Jane Doe"
$ git config --global user.email "jd@example.com"
$ git config --global color.ui auto
$ git config --global init.defaultBranch main
- Check your configuration
$ git config --global --list
Two Ways To Create Projects
Pay attention hereChances are high that using the wrong way in the wrong context will lead to frustration, and the need to blow away your project and start over.
You will either:
If you are starting fresh:
- Create a repo at GitHub, making sure to check Initialize this repository with a README.
- Clone the repo to your computer, which creates your workspace folder, your local repo (the hidden .git subfolder), and connects everything up.
OR
If you already have code on your machine:
- Go to the folder with the project code.
- Run
git init(this creates the hidden subfolder .git). - Create a repo at GitHub, NOT checking Initialize this repository with a README.
- Connect your local repo with GitHub using
git remote. - (Optionally) Setting up branch tracking at the first push.
You need to do things the second way when using tools like Vite, because they create new folders and populate them with a bunch of starter files.
Creating at GitHub then cloning
Do not use
this method
with Vite
We’ll start with a little in-class exercise. After this exercise, you’ll have a GitHub account, and a single repository.
- Select New repository
- On the New repository form:
- Repository name: story
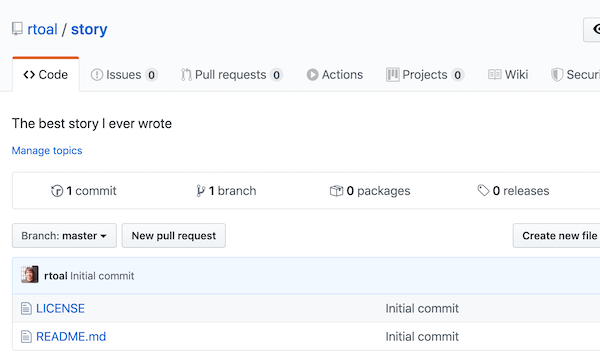
- Description: The best story I ever wrote
- Set it Public (as opposed to Private)
- Check Initialize this repository with a README
- Add a license: MIT License
- Click Create Repository
- Look at your project page on github and admire your first repository. It should show two files: LICENSE and README.md. You can examine the contents of these files if you wish.
- Next, clone this repo to your machine. Go to a folder where you would like to keep your projects. If you need to create this folder, you can, for example do:
$ cd ~
$ mkdir my-projects
$ cd my-projects
- On the github project page, click on the Code button and copy either the HTTPS link or the SSH link, depending on how you use GitHub.
- Do the clone operation:
$ git clone the link you copied - If you are following along in detail, the repo you created earlier was called story, and so your clone operation should have created a new directory called story. Make sure things cloned okay:
$ cd story
$ ls
LICENSE    README.md
- Excellent, you have now used two git commands:
git configandgit clone. It is now time for the one you will use most often:$ git status On branch main Your branch is up to date with 'origin/main'. nothing to commit, working tree clean
Typinggit statusis something you will do again and again and again and again. But wait...doesn’t that output look scary? main? branch? origin? working tree? commit? Lots of technical stuff there, it seems. There is much to learn, but take heart for now: the phrases “up to date” and “nothing to commit” means we’re in a good place.
Creating the workspace manually without cloning
This is
the way to go
with Vite
If you created your workspace manually (without cloning), or Vite made you a workspace, then great! You’ve come to the right place. Here’s a little exercise you can do to work through the process. We’ll start completely from scratch and use Vite to make us a little project:
- Let’s make a react project and cd into it. (At the
npm createline, answer the prompts to create a React project with JavaScript.)$ cd ~ $ mkdir web-projects $ cd web-projects $ npm create vite@latest counter $ cd counter
- At GitHub, invoke New Repository. When making the new repository, DO NOT CHECK Initialize this repository with a README. Click on the Create Repository button. You will be taken to a page with a whole bunch of instructions.
- Just copy the two lines from the section “…or push an existing repository from the command line”
$ git remote add origin git@github.com:•••••/counter.git
$ git push -u origin main
- Simply refresh the browser page (the one with all those instructions). You will now see all that React starter code.
Add, Commit, Push
The rest of these notes pick up the Story example above. (If you only did the little exercise in this section with Vite and you wish to follow along, you might want to go back and create the story repo. Or simply just read on.)
- In the workspace folder for your Story project, bring up your favorite code editor and let’s add a new file called story.txt. In this file go ahead and enter
It was a dark and stormy night.You can change it later, of course. Save the file. Now dogit statusagain:$ git status On branch main Your branch is up to date with 'origin/main'. Untracked files: (use "git add
So, we have an untracked file. Not all files in your workspace will need to be tracked by git; but for those that you want to track, you have to add them:..." to include in what will be committed) story.txt nothing added to commit but untracked files present (use "git add" to track) $ git add story.txt $ git status On branch main Your branch is up to date with 'origin/main'. Changes to be committed: (use "git restore --staged
Great, so we’ve added the file and git tells us two things: (1) that it is a change ready to commit, and (2) that if we want to unstage it, we can. So it sounds like what we’ve added it to is called the stage. Cool! Also, that as soon as we are happy with our changes, we can commit them...." to unstage) new file: story.txt - Commit. Committing tells git that we did a unit of work that we are happy with. Always supply a commit message with your commits.
$ git commit -m 'Write first line of file'
[main d484c4c] Write first line of file
  1 file changed, 1 insertion(+)
  create mode 100644 story.txt
Your response message will differ. In the response above, the value d484c4c is a unique identifier for the commit. You’ll hear people call it a hash. The point is, in git, every commit has a unique identifier. What does our status look like now?$ git status On branch main Your branch is ahead of 'origin/main' by 1 commit. (use "git push" to publish your local commits) nothing to commit, working tree clean
We have no uncommitted changes in our local workspace, but it appears that we’ve committed to a “local” place which is one commit ahead of something called origin/main. So pushing will publish the local commit. Let’s do it:$ git push Enumerating objects: 4, done. Counting objects: 100% (4/4), done. Delta compression using up to 8 threads Compressing objects: 100% (3/3), done. Writing objects: 100% (3/3), 362 bytes | 362.00 KiB/s, done. Total 3 (delta 0), reused 0 (delta 0) To https://github.com/rtoal/story.git 448ddcd..d484c4c main -> mainOkay, lots of technical stuff there, but we didn’t get any errors! And if you do agit statusnow, you’ll see everything looks good.
We saw so many new terms in that little exercise, and now we are ready to actually learn what they all mean. We’ll be using this picture:
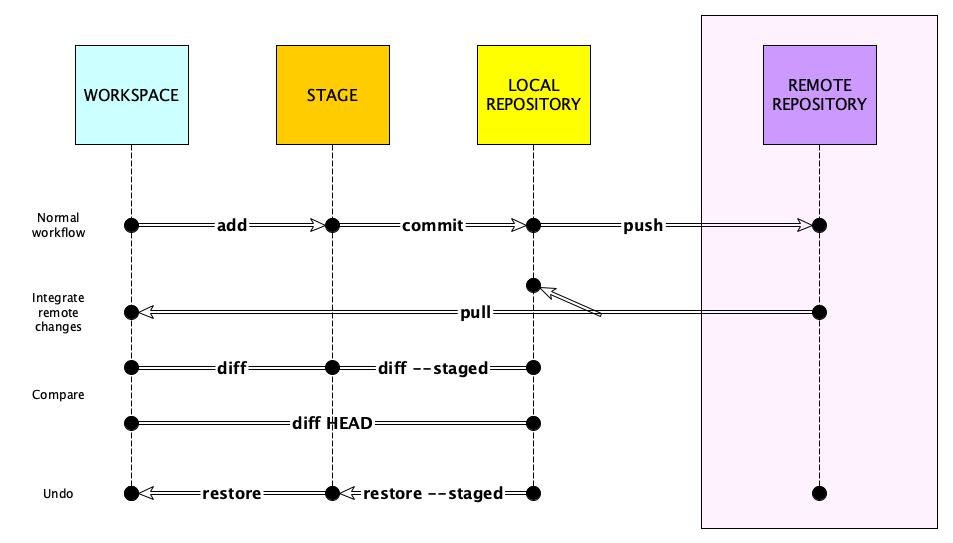
So far we’ve seen the commands add, commit, and push. We know the workspace is where we edit files on our local machine; the stage is where we hold the files we want to commit; our local repository is where we make commits on our local machine.
Real projects are worked on by many people. They each may make commits to their local repositories. At some point they will push the commits form their local repos to a shared remote repository. To get other people’s commits, you will pull them from a remote.
While true, what you just read barely scratches the surface of what is possible. For one thing, there is no notion of branches here. Remember how git was reporting something about the branch main? We haven’t covered that yet.
Pull vs. FetchAn alternative to pull is fetch, which works differently. People have different preferences.
The diagram shows that we can compare the contents of the files in our workspace with those in the stage and those in the local repository. This is a great thing to do frequently as you try to remember what you did recently—especially when you need to make some commits and you need to write an accurate commit message.
Finally, note that the diagram has a couple commands for blowing away your workspace. Only do this if the current code you are working on is a total mess. In reality, you probably won’t need to do this, because you’ll at some point learn about branches.
Next Steps
That might have been an overview of less than 1% of what Git can do, but it’s enough for trivial projects. To continue your study, it is imperative that you learn what exactly commits are, what branches are, how to merge and rebase, how do deal with the infamous merge conflicts, what a detached head is, and what to do when things go wrong. How might you learn all this? Continue reading the rest of the Git Book.

Before You Go
Wait wait there’s more!
Cheatsheets
You’ll definitely benefit from reading the Git Book and getting a lot of practice. Once you start getting the hang of things, cheat sheets become really useful. Here are a bunch. Some might be old, but the more you read, the better.
- One posted on Twitter
- From GitHub Education
- From GitLab
- Another one found on Twitter
- Another one someone tweeted
Slideshows
This is one I made a while back and updated recently. It’s okay but not great. The important thing in it, though, is the link to the Clay Shirky TED talk.
Recall Practice
Here are some questions useful for your spaced repetition learning. Many of the answers are not found on this page. Some will have popped up in lecture. Others will require you to do your own research.
Summary
We’ve covered:
- What Git is and how it differs from GitHub
- Setting up Git
- The basic commands
- Two ways to create projects used with GitHub
- Some cheatsheets and slideshows
- Things to cover next