Building a Web Service with Postgres and Sequelize

Getting Started
Make sure you have installed Node (at least 6.10) and Postgres. Set up Postgres so that the Postgres server runs on port 5432 (the default).
What We’re Going to Build
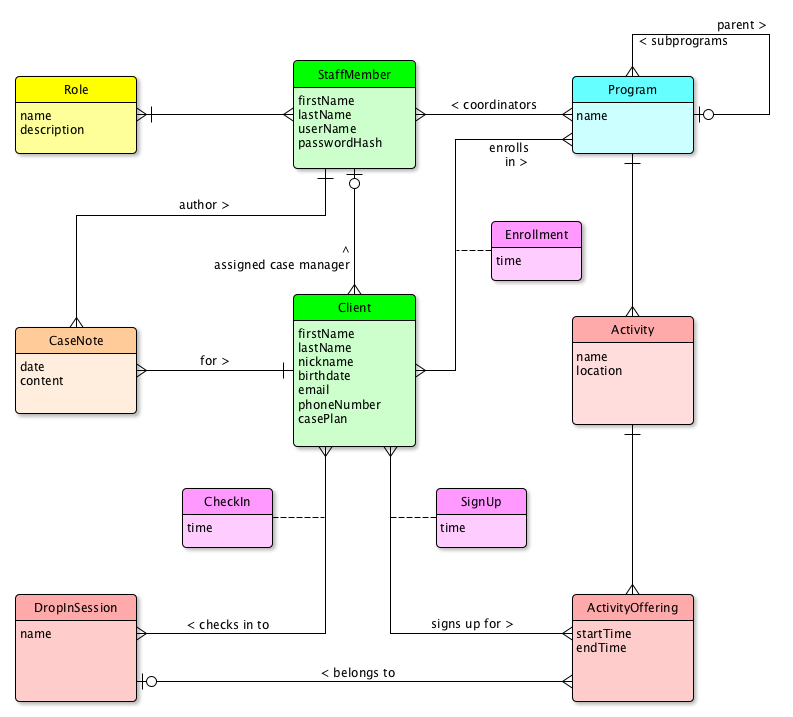
We’re going to build a webservice on top of a relational database for a hypothetical non-profit community service center. Here’s the data model:
How To Build It
Here is a very rough list of steps we take to build up our web service. The list isn’t meant to be perfect; you’ll need to refine certain steps, fill in missing steps, and take care of problems along the way.
- Create a project on GitHub. Ask GitHub to make you a
.gitignorefor Node apps, aLICENSEfile, and aREADME.mdfile. On your local box, clone the project and navigate to your project directory. npm init. Accept most of the defaults, but useNODE_ENV=test mochafor test and the license of your choice. Your project directory should now look like:. ├── .git/ (directory holding your local repo) ├── .gitignore ├── LICENSE ├── README.md └── package.json
- Install eslint into your project. (This will add lines to the
package.jsonfile.)$ npm install eslint --save-dev $ ./node_modules/.bin/eslint --init
For initializing eslint, use the Airbnb style guide and generate the configuration in YAML. You might want to add a couple lines for rules to your eslint config now. Make it look like this:
  extends: airbnb-base
  plugins:
    - import
  rules:
    no-console:
      off
    import/no-dynamic-require:
      off
    import/no-extraneous-dependencies:
      off
Your project directory should now be:
  .
  ├── .eslintrc.yml
  ├── .git/
  ├── .gitignore
  ├── LICENSE
  ├── README.md
  ├── node_modules/
  └── package.json
- Hugely Recommended: Install a plugin for your editor or IDE so the linter can run while you type.
- Make a
bindirectory to hold scripts and aserverdirectory to hold code for the server.$ mkdir -p {bin,server} - Install Express,
body-parser, Morgan, and Nodemon into the project.$ npm install --save express body-parser morgan $ npm install --save-dev nodemon
This writes new lines into the
package.jsonfile, which should now look something like this (yours will vary, of course):{ "name": "community", "version": "1.0.0", "description": "An example web service", "main": "index.js", "scripts": { "test": "NODE_ENV=test mocha" }, "repository": { "type": "git", "url": "git+https://github.com/rtoal/community.git" }, "author": "", "license": "MIT", "bugs": { "url": "https://github.com/rtoal/community/issues" }, "homepage": "https://github.com/rtoal/community#readme", "devDependencies": { "eslint": "^3.17.0", "eslint-config-airbnb-base": "^11.1.1", "eslint-plugin-import": "^2.2.0", "nodemon": "^1.11.0" }, "dependencies": { "body-parser": "^1.17.0", "express": "^4.15.0", "morgan": "^1.8.1" } }If you are new to Node development, or just need a refresher, feel free to check out the documentation for package.json.
- Start coding. Create the file
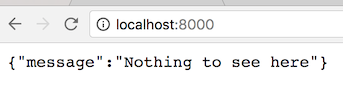
app.jsin the top-level of the project, like so:// A typical Express webservice. All JSON, all the time. Logging with Morgan. const express = require('express'); const logger = require('morgan'); const bodyParser = require('body-parser'); const app = express(); app.use(logger('dev')); app.use(bodyParser.json()); app.use(bodyParser.urlencoded({ extended: false })); // A catch-all route for anything the webservice does not define. app.get('*', (req, res) => res.status(404).send({ message: 'Nothing to see here', })); module.exports = app;(This might be a good chance to see if your linter—if you installed a plugin for your editor or IDE—is working. Try to force a linter error and see if it kicks in. If not, try restarting the editor.)
We’ve set things up for an all-JSON web service. This means we write service endpoints to accept and return plain-old JavaScript objects and the middleware will do all the serialization and deserialization, and all the HTTP header configuration, for us!
- Write a script, in the
binfolder, to launch a web server. Call itwww.js. It should look like this:// This script runs an HTTP server for the application. const http = require('http'); const app = require('../app'); const port = +process.env.PORT || 8000; app.set('port', port); http.createServer(app).listen(port, () => { console.log(`The server is listening on port ${port}`); });Check that your folder structure looks like this now:
.
├── .eslintrc.yml
├── .git/
├── .gitignore
├── LICENSE
├── README.md
├── app.js
├── bin
│   └── www.js
├── node_modules/
├── package.json
└── server
- Now we could start up the server with saying
node bin/www.js, but that’s boring, and besides, we’d have to remember to restart it whenever we made changes to the code. We installednodemona few steps back. Let’s make use of it (it watches for changes int the code and restarts automatically) and let’s also run it fromnpmlike the cool kids do. Add a line to thescriptssection ofpackage.jsonso that it looks like this:"scripts": { "start:dev": "./node_modules/.bin/nodemon ./bin/www.js", "lint": "./node_modules/.bin/eslint .", "test": "NODE_ENV=test mocha" },Yes, we snuck in a line to invoke the linter from the command line too, in case we want to do such a thing.
- Start up the server. In the project root directory, say:
$ npm run start:dev
- Try it out. In a browser, navigate to localhost port 8000 and see:
Look at the console where you invoked
npm run start:dev. You should see output such as:[nodemon] 1.11.0 [nodemon] to restart at any time, enter `rs` [nodemon] watching: *.* [nodemon] starting `node ./bin/www.js` The server is listening on port 8000 GET / 404 3.040 ms - 33
- To see how cool
nodemonis, make a change to the"Nothing to see here"message inbin/www.jsand save the file. Reload the browser page to see the change. You didn’t have to manually restart the server! Now change it back. - Hang on, are we writing code without tests? Make sure
mochais installed globally, and let’s getsupertestinstalled to test our webservice:$ npm install -g mocha $ npm install --save-dev supertest
- Now we want a folder called
testto hold our test code. This folder will also have its very own.eslintrc.ymlfile! So make thetestdirectory, and in it add this.eslintrc.ymlfile:env: mocha: true
and a file called
test/generic_api_test.jsas follows:const app = require('../app'); const request = require('supertest'); describe('GET /', () => { it('responds with a 404 and error message in json', (done) => { request(app) .get('/') .set('Accept', 'application/json') .expect('Content-Type', /json/) .expect(404, { message: 'Nothing to see here' }, done); }); });When this test file is run, supertest will spin up a server on some arbitrary port and run the web service there. We are testing that when we hit the root endpoint, the server will respond with a 404 and the given object.
The project structure is now:
. ├── .eslintrc.yml ├── .git/ ├── .gitignore ├── LICENSE ├── README.md ├── app.js ├── bin │ └── www.js ├── node_modules/ ├── package.json ├── server └── test ├── .eslintrc.yml └── generic_api_test.js - Okay people it’s Sequelize time! Install it globally:
$ npm install -g sequelize-cli
- Create the file
.sequelizercin the project root folder:const path = require('path'); module.exports = { 'config': path.resolve('./server/config', 'config.json'), 'models-path': path.resolve('./server/models'), 'seeders-path': path.resolve('./server/seeders'), 'migrations-path': path.resolve('./server/migrations') }; - Install Sequelize, and a couple Postgres packages, into
package.json:$ npm install --save sequelize pg pg-hstore
- Initialize Sequelize:
- Edit the autogenerated
server/models/index.jsto modern, linter-satisfying JavaScript. Here’s what worked for me:const fs = require('fs'); const path = require('path'); const Sequelize = require('sequelize'); const basename = path.basename(module.filename); const env = process.env.NODE_ENV || 'development'; const config = require(path.join(__dirname, '..', 'config', 'config.json'))[env]; const db = {}; let sequelize; if (config.use_env_variable) { sequelize = new Sequelize(process.env[config.use_env_variable]); } else { sequelize = new Sequelize(config.database, config.username, config.password, config); } fs .readdirSync(__dirname) .filter(file => file.indexOf('.') !== 0 && file !== basename && file.slice(-3) === '.js') .forEach((file) => { const model = sequelize.import(path.join(__dirname, file)); db[model.name] = model; }); Object.keys(db).forEach((modelName) => { if (db[modelName].associate) { db[modelName].associate(db); } }); db.sequelize = sequelize; db.Sequelize = Sequelize; module.exports = db; - Fix up the
server/config/config.jsonfile. Sequelize assumed we were going to do MySQL, but we really want Postgres. Edit the file to be:{ "development": { "username": "postgres", "password": "postgres", "database": "community-dev", "host": "127.0.0.1", "port": 5432, "dialect": "postgres" }, "test": { "username": "postgres", "password": "postgres", "database": "community-test", "host": "127.0.0.1", "port": 5432, "dialect": "postgres" } }We’ve told Sequelize to use the Postgres installation on our local machine for our development and test environments, and use separate databases for them. In a real-life scenario, we would have a
productionentry pointing to a different machine.Don’t commit configuration files containing passwords, and for that matter any kind of identifying information, into a public source code repository. The file above should be added to your
.gitignorefile, with the “real” config files placed on developers’ machines, staging machines, and production machines, by qualified operations team members. Different users will have different configurations; for example, most developers will not see production machine information. - Create the databases. The config file says we’re using Postgres on our local machine, so enter:
$ createdb community-dev
$ createdb community-test
At this point you should go into your Postgres client, and list your databases to ensure they was created. If you are using the command line client
psql, do\l(backslash followed by lowercase ell). Connect to the dev database (\c) and check (\d) that the database is empty (has no tables). You might see something like this:[~]$ psql psql (9.4.11) Type "help" for help. ray=# \l List of databases Name | Owner | Encoding | Collate | Ctype | Access privileges ----------------+-------+----------+-------------+-------------+------------------- community-dev | ray | UTF8 | en_US.UTF-8 | en_US.UTF-8 | community-test | ray | UTF8 | en_US.UTF-8 | en_US.UTF-8 | postgres | ray | UTF8 | en_US.UTF-8 | en_US.UTF-8 | ray | ray | UTF8 | en_US.UTF-8 | en_US.UTF-8 | template0 | ray | UTF8 | en_US.UTF-8 | en_US.UTF-8 | =c/ray + | | | | | ray=CTc/ray template1 | ray | UTF8 | en_US.UTF-8 | en_US.UTF-8 | =c/ray + | | | | | ray=CTc/ray (6 rows) postgres=# \c community-dev You are now connected to database "community-dev" as user "ray". community-dev=# \d No relations found. - Create your first model, letting Sequelize do most of the work. Sequelize is an ORM, so you generally never write SQL. Instead, you create models. You write your application to use instances of these models, and Sequelize will do all the database reads and updates for you:
$ sequelize model:create --name StaffMember --attributes username:string,password:string,firstName:string,lastName:string

Sequelize [Node: 7.8.0, CLI: 2.6.0, ORM: 3.30.2]

Loaded configuration file "server/config/config.json".
Using environment "development".
This command creates the files
server/models/staffmember.jsand (for me, anyway)server/migrations/20170402030928-create-staff-member.js(the leading datetime of that filename is its creation time). As usual, the generated files are ugly and will greatly upset your linter! So let’s clean them up. Makeserver/models/staffmember.jslook like this:module.exports = (sequelize, DataTypes) => { const StaffMember = sequelize.define('StaffMember', { username: DataTypes.STRING, password: DataTypes.STRING, firstName: DataTypes.STRING, lastName: DataTypes.STRING, }, { freezeTableName: true, classMethods: { associate(models) { // eslint-disable-line no-unused-vars // associations can be defined here }, }, }); return StaffMember; };and make the migration file look like:
module.exports = { up(queryInterface, Sequelize) { return queryInterface.createTable('StaffMember', { id: { type: Sequelize.INTEGER, primaryKey: true, autoIncrement: true, allowNull: false }, username: { type: Sequelize.STRING, allowNull: false }, password: { type: Sequelize.STRING, allowNull: false }, firstName: { type: Sequelize.STRING, allowNull: false }, lastName: { type: Sequelize.STRING, allowNull: false }, createdAt: { type: Sequelize.DATE, allowNull: false }, updatedAt: { type: Sequelize.DATE, allowNull: false }, }); }, down(queryInterface /* , Sequelize */) { return queryInterface.dropTable('StaffMember'); }, }; - Now let’s create the
Clientmodel and a migration for it. From the command line:$ sequelize model:create --name Client --attributes firstName:string,lastName:string,nickname:string,birthdate:date,email:string,phoneNumber:string,casePlan:string
- The little
model:createutility not only generates ugly code that we have to clean up; it also fails to generate the one-to-many relationship from staff member to client that we need. So clean up the model while at the same time, adding the association:module.exports = (sequelize, DataTypes) => { const Client = sequelize.define('Client', { firstName: DataTypes.STRING, lastName: DataTypes.STRING, nickname: DataTypes.STRING, birthdate: DataTypes.DATEONLY, email: DataTypes.STRING, phoneNumber: DataTypes.STRING, casePlan: DataTypes.STRING(2000), }, { freezeTableName: true, classMethods: { associate: (models) => { Client.belongsTo(models.StaffMember, { foreignKey: 'caseManagerId', as: 'caseManager', }); }, }, }); return Client; };The class method we added will allow us to programatically get the case manager for a client. But this still needs to be reflected in the actual database table. So clean up the migration script as follows:
module.exports = { up(queryInterface, Sequelize) { return queryInterface.createTable('Client', { id: { type: Sequelize.INTEGER, primaryKey: true, autoIncrement: true, allowNull: false }, firstName: { type: Sequelize.STRING, allowNull: false }, lastName: { type: Sequelize.STRING }, nickname: { type: Sequelize.STRING }, birthdate: { type: Sequelize.DATEONLY }, email: { type: Sequelize.STRING }, phoneNumber: { type: Sequelize.STRING }, casePlan: { type: Sequelize.STRING(2000) }, caseManagerId: { type: Sequelize.INTEGER, references: { model: 'StaffMember', key: 'id', }, }, createdAt: { type: Sequelize.DATE, allowNull: false }, updatedAt: { type: Sequelize.DATE, allowNull: false }, }); }, down(queryInterface /* , Sequelize */) { return queryInterface.dropTable('Client'); }, }; - So we can go from client to case manager programmatically (we get both
client.caseManagerIdandclient.getCaseManager()), but let’s now allow programmatic access “the other way” too. Now go back and edit theStaffMembermodel, so that it looks like this:module.exports = (sequelize, DataTypes) => { const StaffMember = sequelize.define('StaffMember', { username: DataTypes.STRING, password: DataTypes.STRING, firstName: DataTypes.STRING, lastName: DataTypes.STRING, }, { freezeTableName: true, classMethods: { associate: (models) => { StaffMember.hasMany(models.Client, { foreignKey: 'caseManagerId', as: 'clients', }); }, }, }); return StaffMember; };Note: You don’t have to edit the migration file for the staff member table (for now), because the foreign key appears only in the client table! All we did above was create a nice method to access the list of clients that a staff member has.
- Okay run the two migrations:
$ sequelize db:migrate
- Examine your database to see that your new tables were created:
community-dev=# \d List of relations Schema | Name | Type | Owner --------+--------------------+----------+---------- public | Client | table | postgres public | Client_id_seq | sequence | postgres public | SequelizeMeta | table | postgres public | StaffMember | table | postgres public | StaffMember_id_seq | sequence | postgres (5 rows) - Check out the table definitions:
community-dev=# \d "StaffMember"
                             Table "public.StaffMember"
  Column   |           Type           |                         Modifiers
-----------+--------------------------+------------------------------------------------------------
 id        | integer                  | not null default nextval('"StaffMember_id_seq"'::regclass)
 username  | character varying(255)   | not null
 password  | character varying(255)   | not null
 firstName | character varying(255)   | not null
 lastName  | character varying(255)   | not null
 createdAt | timestamp with time zone | not null
 updatedAt | timestamp with time zone | not null
Indexes:
    "StaffMember_pkey" PRIMARY KEY, btree (id)
Referenced by:
    TABLE ""Client"" CONSTRAINT "Client_caseManagerId_fkey" FOREIGN KEY ("caseManagerId") REFERENCES "StaffMember"(id)


community-dev=# \d "Client"
                                      Table "public.Client"
    Column     |           Type           |                       Modifiers
---------------+--------------------------+-------------------------------------------------------
 id            | integer                  | not null default nextval('"Client_id_seq"'::regclass)
 firstName     | character varying(255)   | not null
 lastName      | character varying(255)   |
 nickname      | character varying(255)   |
 birthdate     | date                     |
 email         | character varying(255)   |
 phoneNumber   | character varying(255)   |
 casePlan      | character varying(2000)  |
 caseManagerId | integer                  |
 createdAt     | timestamp with time zone | not null
 updatedAt     | timestamp with time zone | not null
Indexes:
    "Client_pkey" PRIMARY KEY, btree (id)
Foreign-key constraints:
    "Client_caseManagerId_fkey" FOREIGN KEY ("caseManagerId") REFERENCES "StaffMember"(id)
STUDY THOSE TABLE DESCIRPTIONS AND LEARN WHAT EVERY LINE MEANS. MAKE SURE YOU UNDERSTAND THE PRIMARY KEYS AND THE FOREIGN KEY RELATIONSHIPS AND HOW THEY WERE CREATED.
- Now let’s get a taste of what’s coming by creating some sample data in the development database. We’re going to create this data within the Node REPL because we want to look cool—although it’s probably much worse than writing good unit tests first. However, it’s good to see different ways of doing things, so fire up the Node REPL and make some staff members.
$ node
> const {StaffMember, Client} = require('./server/models');
> StaffMember.create({username: 'maric', password: '123456', firstName: 'Mari', lastName: 'Chen'});
> StaffMember.create({username: 'ndmitri', password: 'pass', firstName: 'Nadia', lastName: 'Dmitri'});
> StaffMember.create({username: 'fredd', password: 'qwerty', firstName: 'Fred', lastName: 'Dinh'});
That was much nicer than raw SQL insert statements (and much safer), right?
Exercise: Thosecreatecalls return promises. Do we care when we are running in the REPL?The password column should be understood to be a password hash, not a real password. Proper authentication is not part of this tutorial.
- Hop over to your Postgres client and see what you made:
community-dev=# select * from "StaffMember";
 id | username | password | firstName | lastName |         createdAt          |         updatedAt
----+----------+----------+-----------+----------+----------------------------+----------------------------
  1 | maric    | 123456   | Mari      | Chen     | 2017-04-01 21:14:54.951-07 | 2017-04-01 21:14:54.951-07
  2 | ndmitri  | pass     | Nadia     | Dmitri   | 2017-04-01 21:15:01.16-07  | 2017-04-01 21:15:01.16-07
  3 | fredd    | qwerty   | Fred      | Dinh     | 2017-04-01 21:15:06.171-07 | 2017-04-01 21:15:06.171-07
(3 rows)
- Let’s make some clients. Go back to the Node REPL.
> Client.create({firstName: 'Pedro', lastName: 'Marizzi', phoneNumber: '8885551212'});
> Client.create({firstName: 'Joey', phoneNumber: '9095551212', caseManagerId: 3});
And check the database:
community-dev=# select * from "Client";
 id | firstName | lastName | nickname | birthdate | email | phoneNumber | casePlan | caseManagerId |         createdAt          |         updatedAt
----+-----------+----------+----------+-----------+-------+-------------+----------+---------------+----------------------------+----------------------------
  1 | Pedro     | Marizzi  |          |           |       | 8885551212  |          |               | 2017-04-01 21:16:53.723-07 | 2017-04-01 21:16:53.723-07
  2 | Joey      |          |          |           |       | 9095551212  |          |             3 | 2017-04-01 21:17:00.078-07 | 2017-04-01 21:17:00.078-07
(2 rows)
- Hmm, the second creation call in the previous step relied on knowledge of the case manager id. The great thing about ORMs is that we can deal entirely with objects and not with identifiers. Let’s create a new client this way (back to the Node REPL):
> StaffMember.findOne({where: {lastName: 'Chen'}}).then(mari =>
  Client.create({firstName: 'Alice', email: 'ayao@example.net'}).then(client =>
  client.setCaseManager(mari)));
and verify:
community-dev=# select * from "Client";
 id | firstName | lastName | nickname | birthdate |      email       | phoneNumber | casePlan | caseManagerId |         createdAt          |         updatedAt
----+-----------+----------+----------+-----------+------------------+-------------+----------+---------------+----------------------------+----------------------------
  1 | Pedro     | Marizzi  |          |           |                  | 8885551212  |          |               | 2017-04-01 21:16:53.723-07 | 2017-04-01 21:16:53.723-07
  2 | Joey      |          |          |           |                  | 9095551212  |          |             3 | 2017-04-01 21:17:00.078-07 | 2017-04-01 21:17:00.078-07
  3 | Alice     |          |          |           | ayao@example.net |             |          |             1 | 2017-04-01 21:18:26.784-07 | 2017-04-01 21:18:26.79-07
(3 rows)
That worked, since Mari is the staff member with id=1.
- Continue practicing. Try this update:
> Client.update({
    lastName: 'Yao',
    birthdate: '1999-12-31'
  }, {
    where: { id: 3 }
  });
and this query:
> Client.findAll({attributes: ['firstName', 'phoneNumber']}).then(results =>
  results.forEach(r=>{console.log(`${r.firstName} has phone number ${r.phoneNumber}`)}));
Pedro has phone number 8885551212
Joey has phone number 9095551212
Alice has phone number null
and this query too:
> function showClient(c) { if (c.caseManager) { console.log(`Case Manager of ${c.firstName} is ${c.caseManager.firstName}`); } else { console.log(`${c.firstName} has no case manager`); } } > Client.findAll({ include: [{model:StaffMember,as:'caseManager'}]}).then(cs=> cs.map(showClient)); Case Manager of Alice is Mari Case Manager of Joey is Fred Pedro has no case managerExercise: Surely you would love nothing more right now than to dive deep into the Sequelize docs and learn all the cool ways to query. Spend some quality practice time now. - Before getting back to the webapp, let’s create a many-to-many relationship. Staff members have multiple roles, and a role can be had by many staff members.
$ sequelize model:create --name Role --attributes name:string,description:string
Touch up the model, and add in an association to StaffMember:
module.exports = (sequelize, DataTypes) => {
  const Role = sequelize.define('Role', {
    name: DataTypes.STRING,
    description: DataTypes.STRING(1023),
  }, {
    freezeTableName: true,
    classMethods: {
      associate(models) {
        Role.belongsToMany(models.StaffMember, {
          through: 'StaffMemberRole',
          foreignKey: 'roleId',
          otherKey: 'staffMemberId',
        });
      },
    },
  });
  return Role;
};
and the migration:
module.exports = {
  up(queryInterface, Sequelize) {
    return queryInterface.createTable('Role', {
      id: { type: Sequelize.INTEGER, primaryKey: true, autoIncrement: true, allowNull: false },
      name: { type: Sequelize.STRING, allowNull: false },
      description: { type: Sequelize.STRING(1023) },
      createdAt: { type: Sequelize.DATE, allowNull: false },
      updatedAt: { type: Sequelize.DATE, allowNull: false },
    });
  },
  down(queryInterface /* , Sequelize */) {
    return queryInterface.dropTable('Role');
  },
};
and make the “other side” of the association in the staff member model, yielding this:
module.exports = (sequelize, DataTypes) => { const StaffMember = sequelize.define('StaffMember', { username: DataTypes.STRING, password: DataTypes.STRING, firstName: DataTypes.STRING, lastName: DataTypes.STRING, }, { freezeTableName: true; classMethods: { associate: (models) => { StaffMember.hasMany(models.Client, { foreignKey: 'caseManagerId', as: 'clients', }); StaffMember.belongsToMany(models.Role, { through: 'StaffMemberRole', foreignKey: 'staffMemberId', otherKey: 'roleId', }); }, }, }); return StaffMember; }; - In the previous step, we’ve done enough to automatically create models properly, but this code doesn’t create the database join table. This needs to be done, as far as I can tell, with a hand-written migration (and this answer on StackOverflow seems to back me up). Since you are making this migration by hand, you have to be careful to name it properly with the UTC timestamp of the current datetime. In my case, I called it
20170402043918-create-staff-member-role.js:module.exports = { up(queryInterface, Sequelize) { return queryInterface.createTable('StaffMemberRole', { staffMemberId: { type: Sequelize.INTEGER, primaryKey: true, allowNull: false, references: { model: 'StaffMember', key: 'id', }, }, roleId: { type: Sequelize.INTEGER, primaryKey: true, allowNull: false, references: { model: 'Role', key: 'id', }, }, createdAt: { type: Sequelize.DATE, allowNull: false }, updatedAt: { type: Sequelize.DATE, allowNull: false }, }); }, down(queryInterface /* , Sequelize */) { return queryInterface.dropTable('StaffMemberRole'); }, }; - Run the migration now:
$ sequelize db:migrate
- Let’s look at the table description for the new join table we’ve created, as what we got is very instructive. Back to the database client:
community-dev=# \d "StaffMemberRole" Table "public.StaffMemberRole" Column | Type | Modifiers ---------------+--------------------------+----------- staffMemberId | integer | not null roleId | integer | not null createdAt | timestamp with time zone | not null updatedAt | timestamp with time zone | not null Indexes: "StaffMemberRole_pkey" PRIMARY KEY, btree ("staffMemberId", "roleId") Foreign-key constraints: "StaffMemberRole_roleId_fkey" FOREIGN KEY ("roleId") REFERENCES "Role"(id) "StaffMemberRole_staffMemberId_fkey" FOREIGN KEY ("staffMemberId") REFERENCES "StaffMember"(id) - Let’s explore in the REPL a bit. Remember we’ve made three models (
StaffMember,Client, andRole), even though we have four tables. When writing code, we never “see” the join table. We will use association methods to navigate the many-to-many relationship. First make some roles:> const {StaffMember, Client, Role} = require('./server/models'); > Role.create({name: 'founder', description: 'They started it all'}); > Role.create({name: 'admin', description: 'They administrate stuff'}); > Role.create({name: 'case manager', description: 'They manage cases'}); > Role.create({name: 'director', description: 'They direct stuff'}); > Role.create({name: 'volunteer', description: 'So wonderful'});and make Mari an administrator and a case manager, and make Nadia a case manager too:
> Promise.all([ StaffMember.findOne({where: {lastName: 'Chen'}}), StaffMember.findOne({where: {firstName: 'Nadia'}}), Role.findOne({where: {name: 'admin'}}), Role.findOne({where: {name: 'founder'}}) ]).then(([mari, nadia, admin, founder]) => { mari.addRole(founder); mari.addRole(admin); nadia.addRole(admin); }); - See how the database looks:
community-dev=# select * from "StaffMemberRole";
 staffMemberId | roleId |         createdAt          |         updatedAt
---------------+--------+----------------------------+----------------------------
             1 |      1 | 2017-04-01 21:47:48.512-07 | 2017-04-01 21:47:48.512-07
             1 |      2 | 2017-04-01 21:47:48.513-07 | 2017-04-01 21:47:48.513-07
             2 |      2 | 2017-04-01 21:47:48.518-07 | 2017-04-01 21:47:48.518-07
(3 rows)

community-dev=# select s."firstName" as staff, r.name as role
community-dev=# from "StaffMember" s
community-dev=# left join "StaffMemberRole" sr on sr."staffMemberId"=s.id
community-dev=# left join "Role" r on sr."roleId"=r.id;
 staff |  role
-------+---------
 Nadia | admin
 Mari  | founder
 Mari  | admin
 Fred  |
(4 rows)
How would we make that query in Sequelize?
> StaffMember.findAll({ attributes: ['firstName'], include: [{model: Role, attributes: ['name']}] }).then(s => s.forEach(m=>console.log(m.firstName, m.Roles.map(r=>r.name)))) Nadia [ 'admin' ] Mari [ 'founder', 'admin' ] Fred [] - Okay, enough playing around! Let’s get back to our REST API, and plan out the first few endpoints:
Endpoint Query Params or Request Body Description POST /roles name, description Create a role. GET /roles offset?, limit? Get roles, optionally paginated. POST /staffmembers username, password, firstName, lastName, roles Create a staff member. GET /staffmembers role?, offset?, limit? Get all the staff members, possibly filtered by role, and possibly paginated. Each returned staff member “search result” contains the first name, last name, and the url to retrive the rest of the info. GET /staffmembers/{id} Get a staff member by id. Since this endpoint returns just one staff member, it will return a lot of data: first name, last name, username, the list of the staff member’s roles, and the list of his or her clients (as urls). PUT /staffmembers/{id} username, password, firstName, lastName, roles Replace the staff member identified by the given id with completely new data. - We’ll start with creating roles. But let’s write tests first. Write a test for the
POST /rolesendpoint. Create the filetest/role_test.jscontaining:const app = require('../app'); const request = require('supertest'); describe('POST /roles', () => { it('responds with a 201 the created role on success', (done) => { request(app) .post('/roles') .send({ name: 'admin', description: 'They administrate' }) .set('Accept', 'application/json') .expect(201) .expect('Content-Type', /json/) .expect(/"name":\s*"admin"/) .expect(/"description":\s*"They administrate"/, done); }); }); - Run
npm testand see the failure. You’ll seeUnhandled rejection SequelizeBaseError: relation "Role" does not existbecause we never created any tables in the test database! What we need to do now is run the migrations on the test database. If you’ve been paying attention, you’ve noticed that we’re controlling everything by an enviroment. So we just have to tell the migration to run in the test environment:$ sequelize db:migrate --env=test
At this point you can head over to your database client, switch your database to
community-testand check that the tables are there.... - Now run the test to see the new failure. We now get a 404 instead of 201, because we haven’t implemented the endpoint yet. So let’s implement it. In Express terminology, we implement endpoints with code in controllers. Create the file
server/controllers/roles.jscontaining, for now, just a function:const { Role } = require('../models'); exports.create = (req, res) => { Role.create(req.body).then(role => res.status(201).send(role)); };We have to bind this controller code to a URL path (here we will usePOST /roles), so extendapp.jsto look like this:// A typical Express webservice. All JSON, all the time. Logging with Morgan. const express = require('express'); const logger = require('morgan'); const bodyParser = require('body-parser'); const RoleController = require('./server/controllers/roles'); const app = express(); app.use(logger('dev')); app.use(bodyParser.json()); app.use(bodyParser.urlencoded({ extended: false })); app.post('/roles', RoleController.create); // A catch-all route for anything the webservice does not define. app.get('*', (req, res) => res.status(404).send({ message: 'Nothing to see here', })); module.exports = app; - Run
npm testand see that we now have two tests passing. Note that we tested an actual network call without ever having to run our server: SuperTest did that for us. - Run
npm testseveral times. Now go look inside the test database:community-test=# select * from "Role"; id | name | description | createdAt | updatedAt ----+-------+-------------------+----------------------------+---------------------------- 1 | admin | They administrate | 2017-04-02 10:33:10.382-07 | 2017-04-02 10:33:10.382-07 2 | admin | They administrate | 2017-04-02 10:33:29.881-07 | 2017-04-02 10:33:29.881-07 3 | admin | They administrate | 2017-04-02 10:33:31.236-07 | 2017-04-02 10:33:31.236-07 4 | admin | They administrate | 2017-04-02 10:33:32.137-07 | 2017-04-02 10:33:32.137-07 5 | admin | They administrate | 2017-04-02 10:33:33.083-07 | 2017-04-02 10:33:33.083-07 6 | admin | They administrate | 2017-04-02 10:33:33.98-07 | 2017-04-02 10:33:33.98-07 7 | admin | They administrate | 2017-04-02 10:33:34.905-07 | 2017-04-02 10:33:34.905-07 (7 rows)
Ooops! This is no way to test. We need to clear out the tables before every test! (Do a web search on why we should do this if it is not obvious to you.) - Implement the database clearing code in the Role tester. The simplest way to do this is to empty the table (and reset the corresponding sequence) in the test file itself. Mocha implements a hook called
beforeEachwhich runs before every test:const { Role } = require('../server/models'); const app = require('../app'); const request = require('supertest'); describe('POST /roles', () => { beforeEach((done) => { Role.truncate({ cascade: true, restartIdentity: true }); done(); }); it('responds with a 201 the created role on success', (done) => { request(app) .post('/roles') .send({ name: 'admin', description: 'They administrate' }) .set('Accept', 'application/json') .expect(201) .expect('Content-Type', /json/) .expect(/"name":\s*"admin"/) .expect(/"description":\s*"They administrate"/, done); }); }); - Run
npm testagain (tests will pass) then head over to the Postgres console and look at the Role table in the test database. There should be only one role! - There’s a problem with this solution, though. It make our API test dependent on Sequelize model classes! This is no way to architect a system! The API test should test the API only. So what we need is to get the code to delete all the roles be part of the API. Let’s make a
DELETE /rolesendpoint. But what about security? We don't want to expose that in production. We can make it test only. Update the controller, adding this code:exports.deleteAll = (req, res) => { if (process.env.NODE_ENV === 'test') { Role.truncate({ cascade: true, restartIdentity: true }).then(() => res.status(204).send({})); } else { res.status(403).send({ message: 'Whoa there' }); } };Bind it to an endpoint inapp.js:app.delete('/roles', RoleController.deleteAll);And redo thebeforeEachhook:beforeEach((done) => { request(app).delete('/roles'); done(); }); - Try out this new architecture. Run
npm testa few times and check that the database keeps creating one and only one role. Also, go start the dev server (if you haven’t already, and make sure you started it in development mode) and in a separate window hit the delete endpoint and see your 403:$ curl -i -X DELETE 'http://localhost:8000/roles' HTTP/1.1 403 Forbidden X-Powered-By: Express Content-Type: application/json; charset=utf-8 Content-Length: 24 ETag: W/"18-2t9VCW5wzTvXBFYNu1ZQlfMcrf4" Date: Sun, 02 Apr 2017 19:04:19 GMT Connection: keep-alive {"message":"Whoa there"} - Okay now let's add a
GET /rolesendpoint. Tests first of course, with a little refactoring. Updatetest/role_test.jsas follows:const assert = require('assert'); const request = require('supertest'); const app = require('../app'); function postRequest(name, description) { return request(app).post('/roles').send({ name, description }); } describe('In the role controller', () => { beforeEach((done) => { request(app).delete('/roles').end(done); }); it('POST /roles responds with a 201 and the created role on success', (done) => { postRequest('admin', 'They administrate') .expect(201) .expect('Content-Type', /json/) .expect(/"name":\s*"admin"/) .expect(/"description":\s*"They administrate"/, done); }); it('GET /roles responds with a 200 on success', () => postRequest('admin', 'Running the show').expect(201) .then(() => postRequest('founder', 'Starting it up').expect(201)) .then(() => postRequest('case manager', 'Helping').expect(201)) .then(() => postRequest('volunteer', 'Donating the time').expect(201)) .then(() => request(app).get('/roles').expect(200)) .then((res) => { assert.equal(res.body.length, 4); assert.deepEqual(res.body[0], { name: 'admin', description: 'Running the show' }); assert.deepEqual(res.body[1], { name: 'case manager', description: 'Helping' }); assert.deepEqual(res.body[2], { name: 'founder', description: 'Starting it up' }); assert.deepEqual(res.body[3], { name: 'volunteer', description: 'Donating the time' }); }) // eslint-disable-line comma-dangle ); });Watch the test fail withnpm testas usual, then implement the endpoint soserver/controllers/roles.jswill now be:const { Role } = require('../models'); exports.create = (req, res) => { Role.create(req.body).then(role => res.status(201).send(role)); }; exports.findAll = (req, res) => { // TODO: Support pagination Role.findAll({ attributes: ['name', 'description'], order: ['name'] }) .then(roles => res.status(200).send(roles)); }; exports.deleteAll = (req, res) => { if (process.env.NODE_ENV === 'test') { Role.truncate({ cascade: true, restartIdentity: true }) .then(() => res.status(200).send({ message: 'No more roles' })); } else { res.status(403).send({ message: 'Whoa there' }); } };and hook it in toapp.jsby adding this line:app.get('/roles', RoleController.findAll);Run the test suite to get it to pass.
$ sequelize init
This command creates a bunch of directories and files. The automatically generated code is not very good, and will cause a huge number of linter errors. We should clean up immediately.
That’s Enough For Now
This has been a lot to go through, but you’ll notice we barely scratched the surface of building what we said we would. Not only do we have many more endpoints to go, but we haven't even talked about pagination and authentication.
However, we’ve probably seen enough to get the basics ideas across. You can head over to GitHub where you’ll see the finished application the entire project is still under development, but farther along that what’s documented here.