Simple Static Web Apps
Static Web Apps
A static web app is a web app that in which all of the HTML, CSS, and JavaScript are completely written ahead of time, never generated by a server.
A First Example
We will start simply, but not too simply. Too simply would be making a file consisting exclusively of the text Hello, World and opening that in a browser. No one would care too much about that. Instead, we will make a useful application.
The HTML
Starting with CodeSandbox or any other development environment (The p5js Web Editor, Replit, Glitch, etc.), build your index.html like so (you might have extra items in the head, depending on how your editor primes your workspace—it’s all good):
<!DOCTYPE html>
<html lang="en">
  <head>
    <meta charset="utf-8" />
    <link rel="stylesheet" href="style.css">
  </head>
  <body>
    <h1>Distance Converter</h1>
    <p>
      <input id="in"> in =
      <output id="cm">?</output> cm
    </p>
    <script src="script.js"></script>
  </body>
</html>
An HTML file only states what elements should appear in your document. The head contains information about the document; the body contains what you see—in this case a level-one heading (h1) and a paragraph (p) containing a text input box (input), some text, and an output element. Elements are built from tags. There is almost always a start tag and usually an end tag. An element can also have attributes, which must appear in the start tag, and content, which appears between the tags. The HTML file does not define how the elements look nor how they behave. HTML is pure structure. The link and script elements connect your document to the CSS and JavaScript files that define the look and behavior: create empty files for these if your development environment did not already create them.
The elements of the document form a tree:
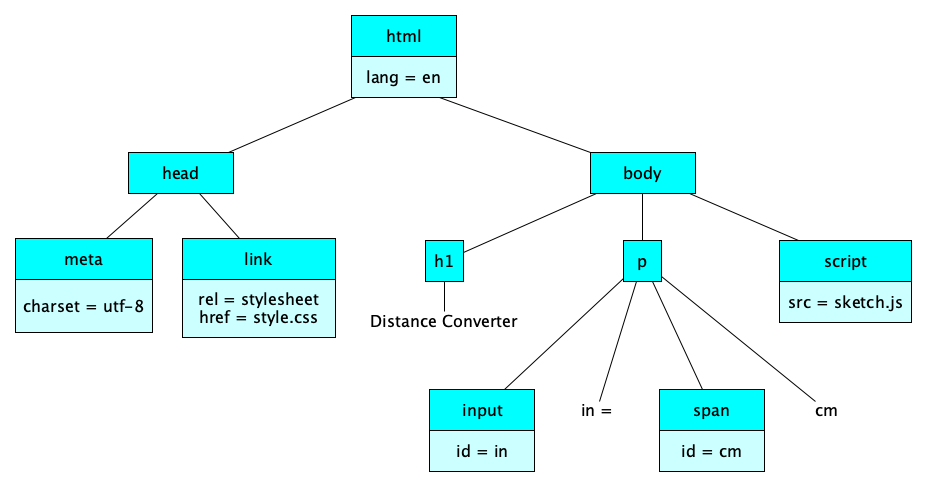
The tree that structures the elements is called the DOM. DOM is short for Document Object Model. That’s because what browsers show you is a document, and the document is made up of objects (well, elements really, but the name “object” stuck), and the HTML provides a structure, or model, or how the objects fit together.
Interested in Computer Science?If so, you should get used to trees. They are ubiquitous in all areas of computer science.
The CSS
HTML defines only the structure of an app; CSS defines its presentation, sometimes called the look-and-feel. What do we mean by presentation? Lots of things:
- Text and Fonts
- Layout, Position, Alignment
- Border, Margins, Padding
- Colors
- Backgrounds
- Image Processing
- Scrolling and Overflow
- Paging
- Masking
- Transformations
- Transitions
- Audio and Speech
Our code-along will only show simple styles for now; make your style.css file like so:
body {
  margin: 0;
  padding: 0;
  background-color: skyblue;
}
h1 {
  background-color: blue;
  color: white;
  margin-top: 0;
  padding: 20px;
  font-family: cursive;
}
p {
  margin-left: 20px;
}
This stylesheet has three style rules. A style rule has a selector and a property list. The property list is a list of property-value pairs.
The JavaScript
We’ve see that HTML is for structure and CSS is for presentation. JavaScript is for behavior. JavaScript is a popular, powerful programming language that can be used pretty much anywhere. It’s superpower is that it was designed to facilitate the construction of asynchronous, interactive, event-driven software. Hey, perfect for webapps! For example, in a web browser, programs mainly just look like this:
When event X occurs, perform action Y.
In our simple distance-converter app, we want to say:
When anything is input in our text box, update the output element with the new computed value.
Here’s the JavaScript code we will build and explain in the code-along. Call your file script.js:
const inchesInput = document.querySelector("#in")
const cmOutput = document.querySelector("#cm")

inchesInput.addEventListener("input", report)

function report() {
  const inches = inchesInput.value
  const centimeters = inches * 2.54
  if (isNaN(centimeters)) {
    cmOutput.textContent = "?"
  } else {
    cmOutput.textContent = centimeters
  }
}
File namesThe actual file names for the CSS and JS files don’t matter too much. Many development environments pre-create these files and give them names like the ones we used here, namely
style.cssandscript.js. Feel free to rename them and give them more meaningful names, perhapsbmi.cssandbmi.js.
Worth restating:
HTML
The content, or structure. The DOM. Elements and Attributes.
CSS
The presentation, or look-and-feel. Rules and Properties.
JavaScript
The behavior, or interaction. Can dynamically change the DOM and the styles.
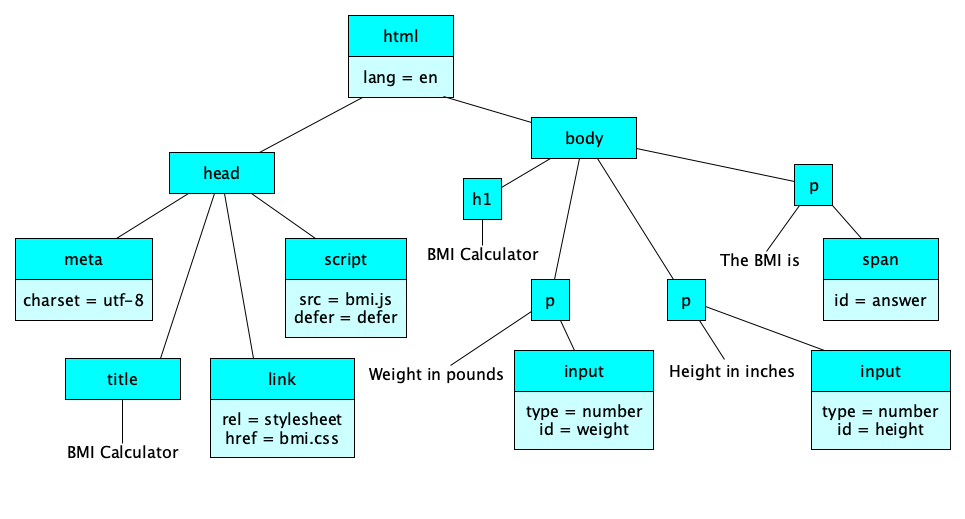
A Slightly More Complex App
Our next code-along will be a little fancier. We’ll have two input boxes. 😮
<!doctype html>
<html lang="en">
  <head>
    <meta charset="utf-8">
    <title>BMI Calculator</title>
    <link rel="stylesheet" href="bmi.css">
    <script src="bmi.js" defer></script>
  <head>
  <body>
    <h1>BMI Calculator</h1>
    <p>Weight in pounds <input id="weight"></p>
    <p>Height in inches <input id="height"></p>
    <p>The BMI is <output id="bmi"></output></p>
  </body>
</html>
The JavaScript program has three main parts:
- Get HTML elements into JavaScript variables by calling
document.querySelectorwith a selector expression. - Attach event listeners to certain elements, so that when an event happens on an element, a particular function is called.
- Implement the functions to handle the events, generally by updating properties on elements (which will automatically make the browser update its display).
const KILOGRAMS_PER_POUND = 0.453592
const METERS_PER_INCH = 0.0254

const heightBox = document.querySelector("#height")
const weightBox = document.querySelector("#weight")
const bmiOutput = document.querySelector("#bmi")

heightBox.addEventListener("input", updateBMI)
weightBox.addEventListener("input", updateBMI)

function updateBMI() {
  const pounds = Number(weightBox.value)
  const inches = Number(heightBox.value)
  const kilograms = pounds * KILOGRAMS_PER_POUND
  const meters = inches * METERS_PER_INCH
  const bmi = kilograms / (meters * meters)
  bmiOutput.textContent = bmi.toFixed(2)
}
This code along is great opportunity to learn about some technical aspects of JavaScript and programming!
In groups of 2-4, extend this BMI application with some enhanced styling (try a background image, some borders, better colors, different fonts, and so on). In the HTML file, try type="number" as an attribute for both of the input elements. See if you can line up the text entry boxes (we haven’t covered this in class, so ask around or search the web, surely CSS has something that might help).
More HTML Elements
So far we’ve seen: html, head, title, meta, link, body, h1, p, input, output, script.
We’ll be covering HTML more thoroughly later, but for now, here are some elements to try out (research required, of course):
- Document organization: section, nav, article, aside, h1, h2, h3, h4, h5, h6, header, footer
- Document blocks: p, figure, figcaption, blockquote, pre, hr, div
- List: ul, ol, li, dl, dt, dd.
- Tables: table, thead, tbody, tfoot, th, td, caption
- Text markup: em, strong, code, mark, sub, sup, small, big, b, i, u, s, a, cite, dfn, abbr, ruby, br, wbr, span
- Media: img, audio, video, source, track, embed, object, param, picture, canvas
- Forms: form, fieldset, legend, label, input, button, select, option, textarea, progress, meter
- Interactive: details, summary, menu, menuitem, dialog
Selectors
So, you’ve built a beautiful, complex DOM for your web app. You have hundreds of elements, beautifully nested in a way that perfectly describes your content in a meaningful way.
Now you need to identify elements, or specific groups of elements, so that you can style them (with CSS) or interact with them (with JavaScript). There are lots and lots of ways to make selectors. In the examples above we saw these selectors:
body, which selected the document bodyh1, which selected allh1elementsp, which selected allpelements#in, which selected the element whoseidattribute wasin#cm, which selected the element whoseidattribute wascm
Wait, How about learning selectors the fun way? Play CSS Diner.
Fancier Styling
So far we’ve seen: margin, padding, border, color, background-color, and font-family.
It seems fitting to take a sneak peak at some of the things you can do with CSS before moving on.
Colors, Shadows, Alignment, and Transforms
Our next code-along will show a message on a rainbow background with some crazy font decorations and rotation. Think of this as a base for exploring CSS, not as a recommended way to style up text in a “real” webapp.
body {
  background-color: #cccccc;
  margin: 0
}
section {
  margin: 10px;
  border: 8px dashed linen;
  font: bold italic 50px Avenir, Helvetica;
  color: white;
  text-shadow: 1px 1px 2px black;
  text-align: center;
  background-image: linear-gradient(90deg, red, yellow, orange, green, blue, purple);
  padding: 30px;
  transform: rotate(-5deg);
}
Speaking of being creative, go ahead and experiment with styles and text. There are several places on the web with tutorials and references for CSS; More complete coverage of CSS will come later in the course.
Styling and AccessibilityBe careful with styling. There are a number of things you need to be aware of, such as not using color to carry meaning (some users may have degrees of color-blindness) and don’t use pictures for text (as some visually-impaired users may require screen readers). Styling can be overdone and detract from your message. However, styling can enhance usability and the user experience, so by all means learn and practice how to style well.
Grid Layout
When you first learn CSS, you start with colors, fonts, borders, padding, margins, shadows, and simple text alignment (left, center, right). Maybe you do transforms (translate, scale, rotate) early.
But a huge part of CSS is known as layout. CSS offers two layout schemes: grid and flex. Grid gives you the ability to section up your page like so:
How exactly does it work? There are a zillion options. Here are some tutorials:
- Grid Tutorial from freeCodeCamp
- W3Schools Grid Lesson
- CSS-Tricks Complete Guide to Grid
- MDN Grid Overview
One of the main uses for grid is to layout a site with a header, footer, navigation panel, and main content area. Sometimes you will want your app to take up the entire browser viewport and anchor the header and footer to the top and bottom of the viewport, and allow the content inside to scroll.
Flex Layout
While grid is generally used for big-picture layout, Flex (aka “Flexbox”) is more about laying out a bunch of items in a row, or maybe in a column, and maybe they “wrap”. To get started, you’ll want to understand three things:
- flex-direction
- justify-content
- align-items
We’ll study them in class using this little widget that you can use for exploration:
Of course there is a great deal more to flex! Check out:
Transitions
CSS properties can be transitioned from one value to another over time. The simplest example is probably to start the transition on hover:
<body><p>Hello</p></body>
p {
  text-align: center;
  transition: scale 3s;
}
p:hover {
  scale: 5;
}
There are four parts to a transition:
- transition-property: the property you are transitioning (e.g.,
margin-left) - transition-duration: how long the transition lasts (e.g.,
5s) - transition-timing-function: how the transition progresses (e.g.,
linear,ease-out,ease-in,ease-in-out,ease) - transition-delay: how long before the transition starts
You normally write them all together with the transition property. Example:
transition: width 2.5s ease 0.5s
We will practice with more transitions, for now, all using hover.
Transitions, like all other CSS properties, can be affected with JavaScript. In the JavaScript section below, there is an example of starting transitions with various events.
Here are some good tutorials and guides for transitions:
- W3Schools Transitions Tutorial
- MDN Guide to Transitions
- An Interactive Guide to CSS Transitions, by Josh Comeau
Fancier JavaScript
In a web app, JavaScript gives you interactivity:
- Getting user input (whether typed, keyboard, mouse movements and clicks, speech, etc.)
- Performing actions, such as changing the DOM, or changing styles.
- Interacting with the outside world (not covered on this page)
So far we’ve only seen getting (1) listening for text box actions via the input event, (2) reading the content of a text box with .value and (3) updating the content of an output element with .textContent. Let’s do more!
Code-Along Time! We'll make a ball-dropping app! We’ll not only learn some new styles, events, and functions, but also some neat JavaScript features such as string interpolation.
The final result:
Bringing It All Together
It’s crucial to remember:
HTML
The content, or structure. The DOM. Elements and Attributes.
CSS
The presentation, or look-and-feel. Rules and Properties.
JavaScript
The behavior, or interaction. Can dynamically change the DOM and the styles.
Here are the essential elements, CSS properties, and JavaScript events we’ve covered so far. How many do you recall?
| HTML | CSS | JavaScript |
|---|---|---|
ELEMENTS:
|
PROPERTIES:
|
FUNCTIONS:
PROPERTIES:
EVENTS:
|
Events are one of JavaScript’s signature capabilitiesJavaScript is known for being all about events. The set of events a JavaScript program can listen for and respond to is set by the environment (browser, mobile device, server, etc.) and programmers can create their own events, too. Here are some events you may encounter:
There are hundreds more.
input, when the text inside an element changes (by typing, cutting, pasting, etc.)keydown, when a key has been pressed downmouseenter, when the mouse cursor has been moved into the bounding box of the elementopen, when a web socket connection has been establishedtouchend, when a touchpoint has been removed from a touch surface
Learning More
These notes have just barely introduced you to HTML, CSS, and JavaScript, covering far less than 1% of what is out there. You’re just getting started. Where can you learn more?
HTML Resources
- Full 4hr Tutorial from freeCodeCamp.org (it’s done by Dave Gray, so it’s really good)
- MDN’s Tutorial
- MDN’s HTML Reference
- W3Schools HTML Tutorial
CSS Resources
JavaScript Resources
- Mozilla JavaScript Guide
- MDN Tutorials
- W3Schools JavaScript Tutorial
- Haverbeke’s Book
- Books by Axel Rauschmayer
Recall Practice
Here are some questions useful for your spaced repetition learning. Many of the answers are not found on this page. Some will have popped up in lecture. Others will require you to do your own research.
- What is a static web app? A web app in which all of the HTML, CSS, and JavaScript are completely written ahead of time, never generated by a server.
- What does the HTML document contain? Elements. (Technically you can also have a document type definition and comments, but mainly the important thing is the elements.)
- What are elements made of in HTML? Tags, attributes, and content.
- Where are the attributes specified in an HTML element? In the start tag.
- What is the tree of elements called? The DOM, or Document Object Model.
- What is CSS for? Presentation, or look-and-feel.
- What are some of the things CSS helps you present? Name at least five. Text and Fonts, Layout, Position, Alignment, Border, Margins, Padding, Colors, Backgrounds, Image Processing, Scrolling and Overflow, Paging, Masking, Transformations, Transitions, Audio and Speech.
- What are style sheets made of? Rules
- What are CSS style rules made of? Selectors and Property lists.
- How do you specify a CSS that says that all h1 elements should be rendered in Arial and green?
h1 {font-family: Arial; color: green} - HTML is for content, CSS for presentation, and JavaScript for what? Behavior, or interaction.
- What is the basic idea behind event-driven programming, as you see in JavaScript for the web? When event X occurs, perform action Y.
- How do we get an HTML elements into a JavaScript variable? Call
document.querySelectorwith a selector expression. - How do we attach an event listener to the JavaScript variable
inputBoxthat calls the functionreportwhenever the user types or pastes in the box?inputBox.addEventListener('input', report) - How do you update the content of the output
answerwith the text "42"?answer.textContent = '42' - What famous webapp will help you learn selectors? CSS Diner
- What are the two main CSS properties for colors? color and background-color
- What are two kinds of CSS layouts? Grid and Flex
- What is a CSS transition? A way to make a property change its value over time.
- How do you make a ball shape using HTML and CSS? Use a
divelement with a border-radius of 50%. - How do you set the position of a div at the coordinates at which the mouse is clicked? Listen for the
clickevent and in the event handler, set its style to position: absolute, and set its top and left properties to the event’soffsetXandoffsetYproperties.
Summary
We’ve covered:
- The relationship between HTML, CSS, and JavaScript
- What The DOM is
- A few HTML elements and attributes
- Some very basic CSS
- JavaScript in the Browser
- A taste of more advanced HTML, CSS, and JavaScript
- Where to learn more