How to Write a Compiler
Getting Set Up
Want to write a compiler? These notes go over the way that I personally like to write compilers, so you’ll find this tutorial very opinionated. If you choose to follow along, make sure you have:
- The latest version of node, npm, and git installed.
- Command line skills.
- GitHub experience.
Understand Your Programming Language
Make sure you know the language very well. Writing a bunch of example programs helps. For these notes, I’m going to implement a slight modification of a language called Tiger, designed by Andrew Appel for a compiler textbook he wrote many years ago. Read the four-page language specification now please.
I’m modifying Tiger a little bit:It’s not that I’m lazy: (1) ASCII is just plain WRONG, (2) writing
- I’m going to allow Unicode instead of just ASCII.
- Within string literals, I won’t use
\^c,\ddd, or\spaces\; instead, I’ll just use the delightful JavaScript\u{...}escapes.- I’m not going to make separate namespaces for types and non-types.
- I’m going to leave out the standard functions
flushandgetchar.var x: xis just silly, and (3) I’m going to target JavaScript, which is async, and flushing and getting don’t really apply.
Tiger is a simple language, and generally very easy to read. Here’s Hello World:
and here’s a slightly longer program:
Seriously, browse the language specification before going further.
Set Up Your Project on GitHub
I’m going to assume you’re already adept with GitHub, so create the project (your language name makes a good project name) with the appropriate README.md (add a logo and some text about your language), LICENSE (MIT or ISC is fine), and .gitignore (have GitHub make this for you: select “Node” when from the dropdown).
Set Up the Project Skeleton
Next, clone your project and go to the project root folder in a Terminal application. You should have these files from the clone operation:
    .
    ├── .gitignore
    ├── LICENSE
    └── README.md
We should organize our project around the major building blocks of a compiler. So go ahead and create a bunch of folders, so your local workspace now looks like this:
    .
    ├── .gitignore
    ├── LICENSE
    ├── README.md
    ├── grammar/
    │   └── __tests__/
    ├── ast/
    │   └── __tests__/
    ├── semantics/
    │   └── __tests__/
    └── backend/
        └── __tests__/
Next, since we’ll be using Node, let’s initialize the project. Invoke:
$ npm init
and answer the prompts; this will create your package.json file and your node_modules folder.
I also recommend using a linter. If your IDE or editor does not already have one installed, you can add project-specific linting with:
$ npm install eslint --save-dev
$ node_modules/eslint/bin/eslint.js --init
Initializing eslint will create a config file. There are a lot of prompts to answer when setting up your linter. Personally, I go with prettier (and I highly recommend it). The prompts may or may not give you everything you need, so you’ll probably have to hand edit. Here’s the .eslintrc.json that I will be using:
Note that I am saying I will be using prettier as the style, and that I’ll be using the CommonJS module system, and Jest for testing. The project itself will be using a console and some unnamed non-arrow functions, so I’ve disabled those rules. Speaking of Prettier and Jest, make sure to add them to the project also:
$ npm install jest --save-dev
$ npm install prettier --save-dev
$ npm install eslint-config-prettier --save-dev
$ npm install eslint-plugin-prettier --save-dev
Your project should now look like:
  .
  ├── .gitignore
  ├── .eslintrc.json
  ├── LICENSE
  ├── README.md
  ├── package.json
  ├── package-lock.json
  ├── node_modules/
  │   └── (A ton of files I am not going to list here)
  ├── grammar/
  │   └── __tests__/
  ├── ast/
  │   └── __tests__/
  ├── semantics/
  │   └── __tests__/
  └── backend/
      └── __tests__/
Write Some Tests for The Grammar
That’s right people, we write tests FIRST! Compilers need lots and lots of tests. The first part of the compiler we will work on is the grammar portion, which defines the grammar and implements a syntax checker. We have to test both that Tiger programs that we expect to be syntactically correct are indeed correct, and Tiger programs with syntax errors should have those errors detected.
Keeping these ideas separate, we’ll make two test files:
│
├── grammar/
│   └── __tests__/
│       ├── grammar.test.js
│       └── grammar_errors.test.js
Here they are:
From the terminal in the project root directory, run:
$ npm test
You should see output similar to:
 FAIL  grammar/__tests__/grammar.test.js
● Test suite failed to run
 FAIL  grammar/__tests__/grammar_errors.test.js
● Test suite failed to run
Test Suites: 2 failed, 2 total
Tests:       0 total
Snapshots:   0 total
Time:        1.103s
error Command failed with exit code 1.
All the tests failed (as they should!) because we have not written the syntax checker. That comes next. We have, however, spent a lot of time writing Tiger code that should and should not compile, so we are deepening our understanding of the language we are writing a compiler for. And that is good.
Write the Grammar
Ohm is the best! (I told you these notes were opinionated.) Let’s write the grammar in the file grammar/tiger.ohm. I’m going to modify the grammar linked above to be more to my taste (I like to include precedence and associativity in my grammars). Here’s my version:
Pro Tip
Use the Ohm Editor while developing your grammar.
THE OHM EDITOR IS AMAZING! You can write all your tests in the Ohm editor and the tests run as you type! So why did we write tests earlier? You should still keep the tests around in your codebase—the Ohm Editor can’t do that for you. Go ahead and develop test cases in the Ohm Editor as you develop your grammar, then, when you are satisfied, you can move them into your project.
Now, since Ohm does most of the work, the syntax checker is pretty straightforward. It will be a function that takes in a string representation of a candidate Tiger program, and returns whether or not the program is syntactically correct. Here is grammar/syntax-checker.js:
The grammar folder should now look like:
│
├── grammar/
│   ├── __tests__/
│   │   ├── grammar.test.js
│   │   └── grammar_errors.test.js
│   ├── syntax-checker.js
│   └── tiger.ohm
Bring in Ohm to the project:
$ npm install ohm-js
Now run those tests until they pass!
 PASS   grammar/__tests__/grammar.test.js
 PASS   grammar/__tests__/grammar_errors.test.js
Test Suites: 2 passed, 2 total
Tests:       25 passed, 25 total
Snapshots:   0 total
Time:        1.005s
Ran all test suites.
✨  Done in 1.72s.
Create the Abstract Syntax Tree Classes
All we’ve done so far is syntax checking. We want a real parser, which produces abstract syntax trees! First, we need to define what the nodes of the abstract syntax tree will be. You need to go through the Ohm grammar and ask yourself which things are relevant to the abstract syntax and which are not. This takes experience, so don’t fret if you don’t get things perfect at first. Make classes for them in the file ast/index.js:
Hopefully that wasn’t so bad.
Get the Parser to Produce ASTs
This part is tedious, but very straightforward! Ohm helps a lot! But not so fast: We should probably get some tests in place first. To test the parser, we want to say that for a given syntactically correct Tiger program, the parser returns exactly the AST we expect. We’ll be creating the parser and a parser test engine so our ast folder will look like this:
  ├── ast/
  │   ├── index.js                (definition of AST classes)
  │   ├── parser.js               (the parser itself)
  │   └── __tests__/
  │       └── parser.test.js
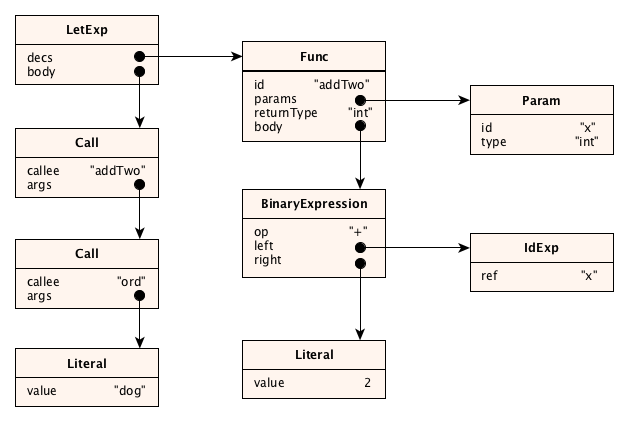
The job of the parser is to take a source program like this:
and produce an abstract syntax tree like this:
Let’s write a tester now. We just have to say for a given Tiger program that we expect a particular AST. To get 100% test coverage, we should make sure that all grammar rules appear somewhere in the test script. Also the parser itself should throw an exception if the parse fails. We don’t have to test all types of syntax errors here: we already did so in the grammar test! We just need one line in our test that says that the parser will throw an exception if there is a syntax error.
At this point, do an npm test and make sure you see failing tests here (they fail because you haven’t written the code yet). This is an important step because it allows you to know the tests were found by the test runner and actually run.
Now for the parser itself. It’s long, but it is written very systematically:
arrayToNullable utility that I wrote myself. Why is it needed?
We should probably run our tests with coverage turned on. Edit your scripts section in package.json to read:
  "scripts": {
    "test": "jest --collect-coverage"
  },
Now run your tests. You should see 100% coverage for the parser.
Do Semantic Analysis
Understanding Semantic Analysis
As you know, it’s very possible that your program has no syntax errors, but is still semantically meaningless. In a static language like Tiger, the semantic checking phase of the compiler is huge! The following are just some of the rules required:
- Identifiers must be in scope before they are used. (Identifiers for the built-in types
intandstring, and all the built in functions, are assumed to be pre-declared in a scope that encloses the entire program.) - Identifiers must not be declared more than once in a scope.
- All fields in a record type must be unique within the type declaration.
- In a variable declaration, the type of the initializer must be compatible with the declared type of the variable, if a declared type exists. (If there is no declared type, it’s fine, the variable gets declared with the inferred type of the initializing expression.)
- In an assignment, the type of the source must be compatible with the type of the target.
- In a call (or operator invocation), the number of arguments must match the number of parameters in the callee.
- In a call (or operator invocation), the types of the arguments must be compatible with the types of the corresponding parameters.
- The order, names, and types of bindings in a record expression must match the fields of the corresponding record type exactly. By match we mean the order and names are exactly the same, and the types of the record expression arguments must be compatible with the declared types of the fields.
- The types of the
thenandelseparts of anif-then-else-expression must be the same. - The types of the
thenpart of anif-then-expression must be the void type. - A
breakexpression may only appear within afororwhileexpression; however, watch out for function declarations inside of loops—see why? - Any cycle of recursive types must pass through at least one record type.
All of these checks must be made pursuant to the scope rules of the language, summarized here as:
- The scope of a variable begins at its declaration and runs to the end of the block in which it is declared.
- The scope of a type or function is the entire block in which it is declared (necessary to allow for recursive functions and recursive types).
- The scope of a record field is the body of the record type and any record expression of that type.
var x: int := x legal in Tiger? Why or why not? If yes, what does it mean? If not, why not?
And of course, to make these checks, we have to compute the types of every expression. There are rules for that too:
- The type of an integer literal is int; the type of a string literal is string; the type of
nilis the special Nil type. - The type of an identifier expression referring to a variable is the type of the variable.
- The type of array, record, subscript, and member expressions should be obvious. The language specification has the details.
- Type type of a
for,while,assignmentorbreakexpression is ”void” which is a way of saying the expression doesn’t really have a type. - The type of an
if-thenexpression is void; the type of anif-then-elseexpression is the type of the bodies (which must match). - The type of a
letexpression or expression sequence is ”void” if the body or sequence is empty, otherwise it is the type of the last expression. - The type of a call expression is the return type of the function being called (which might be void).
Semantic analysis proceeds by traversing the AST and performing actions at each node. These actions include: entering declarations into a context object for easy lookup later; resolving identifer references to the declarations they refer to; computing the type of an expression; performing legality checks. Here’s an example. Given the following AST:
we will process it into the following semantic graph:
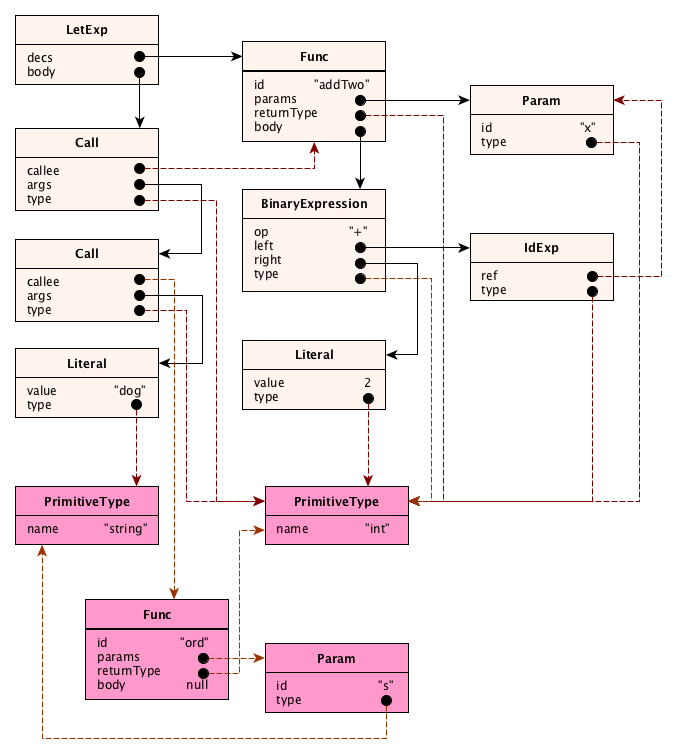
See what we did?
- In the AST, the properties representing identifiers for variables, functions, and types were resolved to be references to the actual nodes for the variables, functions, and types. (In other words, in the AST they were identifiers, but after semantic analysis they turned into node references!
- Expression nodes got a new property, called
type. (This makes type checking much easier.) - New nodes were added, where necessary, for the built-in types and standard functions.
This is important, so let’s summarize.
What a semantic analyzer does:
- Create nodes for the built-in functions and types
- Add a type field for all expressions
- Resolve all identifier references to point to the actual variable, function, or type nodes
- Apply all semantic checks defined by the language.
It is helpful to write the semantic analysis component by breaking it up into modules:
├── semantics
│   ├── builtins.js        (definitions of int, string, and standard functions)
│   ├── check.js           (helper for the analyzer to make things easier to read)
│   ├── analyzer.js        (methods for processing each type of node)
│   ├── context.js         (all the contextual data to process a node)
│   └── __tests__
│       ├── semantics.test.js             (positive tests)
│       └── semantic_errors.test.js       (negative tests)
Semantic Analysis Tests First
Let’s start with tests. We need a positive test file with a legal semantic program in it, and a negative test file, containing a large number of program fragments that are syntactically correct but semantically incorrect. Here they are:
Writing the Semantic Analysis Modules
Let’s start with the built-ins module. It contains objects for the primitive types, as well as objects for the built-in functions and their parameters.
Note that we added a builtin property to each standard function. This isn’t necessary in general, but four our compiler it will allow us to generate much better code when these functions are called.
Next we build a checker. The point of a checker module is to allow the semantic analyzer to look like well-written prose; it’s nicer to say check.isString(e) rather than having hundreds of if-statements scattered throughout the code. Each of the checks defer to a generic checker which throws an exception if the check is not truthy.
You don’t have to write all the checks first! You will no doubt write the checker along with writing the analyzer; that’s kind of expected.
Here’s the analyzer. Note that is makes reference to a context object. A context object holds, you guessed it, all the context-sensitive information required to carry out analysis. Some information spans wide swaths of the AST, so we have to pass this (contextual) information around in...context objects. We use context objects to:
- Record all the local declarations as we encounter them (so we can lookup identifiers when they are used)
- Record whether we are in a loop or not. This is useful because
breaks can only legally appear within a loop. - Record the current function. This is not actually necessary in Tiger, but in most programming languages that have statements, you need to know whether you are in a function so you can properly check
returnstatements.
Here are the context and analyzer modules:
These modules are pretty big! But this isn’t really surprising. Syntax was much easier: grammar processing is a well-understood process, so we get great libraries like Ohm that can parse pretty much any language. But semantic processing is language-dependent, context-sensitive, and full of sometimes messy and crazy rules.
There is quite a bit to study in these modules. Note some gymnastics required to allow functions to be called before they are declared, among other things.
Generate Target Code
If all the semantic checks pass, we’re ready to walk our semantic graph and output some code. We can output JavaScript, C, LLVM, some made-up intermediate language, some virtual machine language, or anything really. In these notes, we’re going to output JavaScript.
There’s no real magic here; things are pretty straightforward. But there are some useful things to keep in mind:
- Tiger and JavaScript have different reserved words. So we put a numeric suffix on each of the identifiers to distinguish them. The mapping from Tiger entity to JavaScript identifier name is kept in a little cache in the code generator.
- Types are used only in the front-end of the compiler. One all the types are inferred, resolved, and checked, we know are Tiger program is type-safe. So we ignore them during code generation.
- We’ll do “inlining” on the built-in functions.
- Because Tiger is expression-oriented and JavaScript is statement-oriented, handling let-expressions and expression sequences is absoutely maddening. It is not at all easy.
When generating JavaScript code, we don’t have to expend any real effort into making the output pretty; we will use a third-party module for that:
$ npm install js-beautify
That’s it really. Here’s the code:
WAIT WAS THAT A REAL CODE GENERATOR?
Perhaps you expected that we would first turn the AST into some kind of intermediate code, and then do code generation to a register-based machine like an x86 or MIPS, with all that flow analysis, static single assignment stuff, graph coloring for register allocation, and pipeline analysis.Well no, not today. When your compiler targets and existing language like JavaScript or C, you can simply rely on the fact that the authors of the JavaScript and C compiler did that work already.
Woops we forgot the test. Let’s put one together. Jest makes some things easy; we’ll provide a regex for the expected target program. We won’t always know the exact form of identifiers for our target code, but we can use regex backreferences at least (that’s super cool actually):
Optimization
In practice, you do optimizations, or code improvement, at several different places throughout a compiler. Note that above, we did a little function inlining within the generator. But many compilers have a special optimization pass that runs on the decorated AST, right after semantic analysis. Let’s add an optimizer:
  ├── semantics
  │   ├── optimizer.js
For now, let’s just hack in some strength reductions, constant folding, and get rid of dead code like while expressions with a known-false test.
There’s room for plenty more, but this is a good start.
Packaging It All Up
Wait, where’s the actual compiler? Let’s package everything up so that (1) people can include our compiler as a module in their own code (invoke it programmatically) and (2) run the compiler as a command line script. A command line user can invoke:
$ node tiger.js myfile.tig
and get the target JavaScript written to standard output, or if there is an error, some error text to standard error. We can allow command line options such as:
-aStop after generating the AST, and print the AST.-iStop after semantic analysis, and print the semantic graph.-oDo optimizations.
The programmatic interface will simply be:
const { compile } = require('tiger-compiler');
const js = compile(tigerProgramString);
Processing command line arguments is best done with a third-party package, so:
$ npm install yargs
Here’s the script! Check out how it can be used both as a script and a module.
Here’s how you can run it from the command line:
$ cat docs/examples/small.tig
let
  type point = {x: int, y: int}
  function second(p: point): int = p.y
  var p := point { x = 300, y = 500 }
in
  print(substring("the red dog", p.x - 296, second(p)))
end

$ node tiger.js docs/examples/small.tig -a
LetExp {
  decs:
    [ TypeDec {
        id: 'point',
        type:
        RecordType { fields: [ Field { id: 'x', type: 'int' }, Field { id: 'y', type: 'int' } ] } },
      Func {
        id: 'second',
        params: [ Param { id: 'p', type: 'point' } ],
        returnType: 'int',
        body: MemberExp { record: IdExp { ref: 'p' }, id: 'y' } },
      Variable {
        id: 'p',
        type: null,
        init:
        RecordExp {
          type: 'point',
          bindings:
            [ Binding { id: 'x', value: Literal { value: 300 } },
              Binding { id: 'y', value: Literal { value: 500 } } ] } } ],
  body:
    [ Call {
        callee: 'print',
        args:
        [ Call {
            callee: 'substring',
            args:
              [ Literal { value: 'the red dog' },
                BinaryExp {
                  op: '-',
                  left: MemberExp { record: IdExp { ref: 'p' }, id: 'x' },
                  right: Literal { value: 296 } },
                Call { callee: 'second', args: [ IdExp { ref: 'p' } ] } ] } ] } ] }

$ node tiger.js docs/examples/small.tig -i
0 (LetExp) decs=[#1,#6,#10] body=[#16]
1 (TypeDec) id='point' type=#2
2 (RecordType) fields=[#3,#5]
3 (Field) id='x' type=#4
4 (PrimitiveType) id='int'
5 (Field) id='y' type=#4
6 (Func) id='second' params=[#7] returnType=#4 body=#8
7 (Param) id='p' type=#2
8 (MemberExp) record=#9 id='y' type=#4
9 (IdExp) ref=#7 type=#2
10 (Variable) id='p' type=#2 init=#11
11 (RecordExp) type=#2 bindings=[#12,#14]
12 (Binding) id='x' value=#13
13 (Literal) value=300 type=#4
14 (Binding) id='y' value=#15
15 (Literal) value=500 type=#4
16 (Call) callee=#17 args=[#20]
17 (Func) id='print' params=[#18] builtin=true
18 (Param) id='s' type=#19
19 (PrimitiveType) id='string'
20 (Call) callee=#21 args=[#25,#26,#30] type=#19
21 (Func) id='substring' params=[#22,#23,#24] returnType=#19 builtin=true
22 (Param) id='s' type=#19
23 (Param) id='first' type=#4
24 (Param) id='n' type=#4
25 (Literal) value='the red dog' type=#19
26 (BinaryExp) op='-' left=#27 right=#29 type=#4
27 (MemberExp) record=#28 id='x' type=#4
28 (IdExp) ref=#10 type=#2
29 (Literal) value=296 type=#4
30 (Call) callee=#6 args=[#31] type=#4
31 (IdExp) ref=#10 type=#2

$ node tiger.js docs/examples/small.tig
function second_1(p_2) {
  return p_2.y
};
let p_3 = {
  x: 300,
  y: 500
};
console.log("the red dog".substr((p_3.x - 296), second_1(p_3)))

$ node tiger.js docs/examples/small.tig | node
red dog
Notice that we actually snuck in a new module there for viewing the semantic graph. Why? Because if we just used util.inspect for a graph, we would not see where nodes were shared, and we could get into trouble with cycles! Hopefully, you’ll find the output understandable, but you may have to draw pictures to get the full effect.
Here’s the code, in semantics/viewer.js. If you like computer science, you’ll probably enjoy the tree traversal and the caching going on here:
Try It Yourself
Thanks for reading, and be sure to check out the entire project on GitHub.
You might feel like adding some new features to the Tiger language. Or enhancing the compiler. Or using it as a basis for a language you design and implement yourself.