A Larger React App

About This Exercise
This is another code-along, where things will be explained in class, so the notes on this page are not very detailed.
The little app I’m building here is the same as the one in videos 23-24 of The Net Ninja’s old React tutorial linked above. I’ve modernized the React to use Hooks rather than classes, changed some names, used Material UI instead of Materialize styles, and integrated Git into the tutorial, but all credit for the app design itself goes to The Net Ninja.
The Code-Along
Step 1: Get Ready
This code-along assumes you’ve gone through the introduction to command line React applications. So we’ll assume you have Node.js installed and know how to run npm create.
Create a React project with Vite on your laptop. Call it todolist.
Go into that new folder, fire up vscode for this project, and in a terminal window inside of vscode, do npm install then npm run dev. Go to localhost 5173 and make sure Vite built everything okay.
Do the usual cleanup-after-project-initialization things:
- Edit README.md to just say
# Todos - Change the title in index.html to
Todos - In src/App.jsx remove the imports of the logos and replace the body of the component to just return something like
<h1>Todos</h1> - Delete react.svg from the src/assets folder
- Remove any useless CSS rules from src/index.css and src/App.css
Save everything and look at the browser window. If you don't see your app running as you expect, check your code for typos and other problems. Make sure the Vite watcher is still running.
Step 2: Start using Git and GitHub
Open a second terminal window in vscode so your watcher can still run in the other window. In this new window, initialize a local repo and commit what you made so far:
$ git init
$ git add .
$ git commit -m 'Getting started'
Do git status, git diff, and git log as needed.
Connect the project to GitHub. At GitHub, create a new public repository called todos, entering a project name and description only! DO NOT HAVE GITHUB ADD A README. DO NOT HAVE GITHUB ADD A LICENSE. Name and description only. Clicking on the Create repository button will create your repo and leave you at an instructions page. See the part where it says “…or push an existing repository from the command line”? Copy those three lines and paste them into your terminal (you should be in your project directory still):
$ git remote add origin git@github.com:YOURGITHUBNAMEHERE/todos.git
$ git branch -M main
$ git push -u origin main
Refresh your repository page at GitHub and note your commit.
Step 3: Let’s get programming
Before writing code, let’s sketch out the architecture of our app. React is all about components. We will want three components:
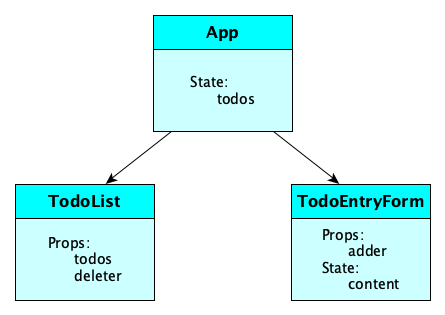
The app component holds the actual list of todos in its state. This will be passed as a prop to the todo-list component which will render them, and respond to clicks on the items by deleting them. The main component has to pass the deleter function as a prop. The todo-entry-form component will hold as its state whatever a user is typing, and calls its passed-in adder function to add to the app’s state. To get started with all this, edit src/App.jsx to look like this:
import { useState } from 'react';

export default function App() {
  const [todos, setTodos] = useState([
    {id: 1, content: 'Meet Masao for Udon'},
    {id: 2, content: 'Fix up these horrible React notes'},
  ]);
  return (
    <div>
      <h1>Things To Do</h1>
    </div>
  );
}
The React way is to keep the state high up in the tree and pass it down to subcomponents that will do the rendering. Create the file src/TodoList.jsx like so:
export default function TodoList({ todos }) {
  const todoList = todos.length ? (
    todos.map(todo => <div key={todo.id}>{todo.content}</div>)
  ) : (
    <p>No todos left</p>
  );
  return <div>{todoList}</div>;
}
We don’t see anything yet, because we haven’t actually added a TodoList component to the App component. We set up the TodoList to accept a list called todos in its props. So when we define the component in App.jsx we can pass it the todos. In App.jsx enter this line at the end of the import section:
import TodoList from './TodoList'and this line after the
h1 element:
<TodoList todos={todos} />
Look at the browser page now. You should see your todos!
Let’s add delete functionality. We want that when we click on a todo, it is deleted. In React, we just have to change the state and the page will re-render. But you can only change the state by calling the setter function! Do not (repeat DO NOT) try to change the value that the getter gave you. One way to do this deletion is for App to pass setTodos as a prop, but this gives the TodoList component too much power. Instead, we create a function in App called deleteTodo and pass just that down as a prop. Edit the components like so:
export default function TodoList({ todos, deleter }) {
  const todoList = todos.length ? (
    todos.map(todo => {
      return (
        <div key={todo.id}>
          <span onClick={() => deleter(todo.id)}>{todo.content}</span>
        </div>
      );
    })
  ) : (
    <p>No todos left</p>
  );
  return <div>{todoList}</div>;
}
import { useState } from 'react';
import TodoList from './TodoList'

export default function App() {
  const [todos, setTodos] = useState([
    {id: 1, content: 'Meet Masao for Udon'},
    {id: 2, content: 'Fix up these horrible React notes'},
  ]);
  function deleteTodo(id) {
    setTodos(todos => todos.filter(todo => todo.id !== id));
  }
  return (
    <div className="App">
      <h1>Things To Do</h1>
      <TodoList todos={todos} deleter={deleteTodo} />
    </div>
  );
}
It might be a good time to commit and push now. You know the drill, right:
$ git add .
$ git commit -m 'Add the delete functionality'
$ git push
Good thing we used the -u on the first push, so now we can just say git push. (Oh, are you doing your git stuff in a different terminal window? Cool if you are. If not, just remember to npm run dev again.)
Step 4: Review some technical terminology
Components, State, and Props
Let’s not be to hand-wavy about this stuff. There are some important things worth knowing here:This all gets easier the more you practice. You will see these concepts take shape in your mind, and become second nature, over time.
- Components can have state and/or props or neither.
- Props are read-only. They are passed to the component.
- State is mutable, but there are rules you must follow to mutate properly:
- NEVER modify state directly, use the setters!
- If you need to set the state based off of the current state, pass a function to your setter that takes in the current state. (You can find the reasons why in the React documentation; for now, just do it.)
Step 5: Forms!
Let’s make a component with a form to add a todo. This state of this component will be just the value being typed in the input box; it updates whenever the input box changes. When the form is submitted, we’ll update the todo list in App. How? App will pass a function to the form, as a prop, to update App’s state. Takes getting used to, perhaps, but it’s so good. Here is the new component src/TodoEntryForm.jsx:
import { useState } from 'react';

export default function TodoEntryForm( { adder }) {
  const [content, setContent] = useState('');
  function submit(e) {
    e.preventDefault();
    adder({ id: Math.random(), content });
    setContent('');
  }
  return (
    <form onSubmit={submit}>
      <input value={content} onChange={e => setContent(e.target.value)} />
    </form>
  )
}
And here are the additions to src/App.jsx (you should know where they go by now!):
import TodoEntryForm from './TodoEntryForm';
function addTodo(todo) {
  setTodos(todos => [...todos, todo]);
}
<TodoEntryForm adder={addTodo} />
Add, commit, push.
Do some user testing. You might find this bug: If you hit Enter with an empty todo in your form, you’ll actually have an empty string todo in your list, but it renders as nothing, and you can’t get your cursor over it to delete it and you’ll never see the “No todos left” ever again. We need to prevent empty todos:
function submit(e) {
  e.preventDefault();
  if (content.trim()) {
    adder({ id: Math.random(), content });
  }
  setContent('');
}
Add, commit, push.
Step 6: Get the keys right!
Wait, wait, Math.random() is a silly hack for ids! It isn’t good enough. What can we use instead? We can use uuids. They’re not built in to JavaScript, but we can install a package and use them:
$ npm install uuidIn the entry form component, import:
import uuidv4 from 'uuid/v4';and use it:
adder({ id: uuidv4(), content });
Add, commit, push.
Step 7: Style it up
There are different ways we can do styling in React:
- Just write the CSS ourselves.
- Place some existing CSS library in to a
<link rel="stylesheet">element in the document head and some associated JavaScript. The libraries muicss and Materialize work this way. - Use a component library like Material UI.
If you would like Material UI, add it in to the project:
$ npm install @material-ui/core
Continue with the Material UI documentation and make the app pretty nice looking. Try out the Typography element, among others.
Recall Practice
Here are some questions useful for your spaced repetition learning. Many of the answers are not found on this page. Some will have popped up in lecture. Others will require you to do your own research.
- Give the steps in setting up a JavaScript React app with Vite.
npm create vite@latest- Go into the folder
npm installnpm run dev
- What files should you clean up after using Vite’s React starter template?
- Change README.md to describe your project
- Choose a good title in index.html
- Remove the logo imports and most starter code from src/App.jsx
- Delete src/assets/react.svg
- Clean out src/index.css and src/App.css to remove useless styles.
- What is the difference between a state variable and a prop? Props are read-only and passed to a component. State is mutable and local to a component.
- How do we think about state from the point of view of React architecture? State is kept high up in the tree and passed down to subcomponents that will do the rendering.
- How do we change the content of a state variable? We never modify state directly, but use the setter function. If we need to set the state based off of the current state, we pass a function to the setter that takes in the current state.
- Give code that “adds” the value
"Hilo"to the list contained in the state variableplacesin a React application.setPlaces(places => [...places, "Hilo"]) - Give code that “removes” the value
"Hilo"from the list contained in the state variableplacesin a React application.setPlaces(places => places.filter(place => place !== "Hilo")) - When creating a list of elements in React, what is a super important thing to remember that is easy to forget? Always give each element a unique key (via the
keyattribute). - If it is hard to think up a good unique key, what’s one thing you can always rely on? The
uuidpackage can generate unique ids for you.
Summary
We’ve covered:
- Scaffolding a React app with Vite
- Connecting to Git and GitHub
- React architecture
- Building a TODO app
- The existence of React component libraries